I have been looking for a small portable alternative to carting my tripod around with me for quite some time now. There have been many occasions when I’ve been out photographing and could have used the support that a tripod provides, but could not be bothered to lug my tripod with me. I have tried using a variety of small tabletop tripods. None of them were strong enough to support a DSLR and heavy lens. Beanbags are cumbersome to carry around as well. This past summer I stumbled upon a Kickstarter campaign for Platypod Pro Max, and I was intrigued. Could this possibly be the answer to my search?
So What is a Platypod?
Platypod Pro Max ($99.00 from B&H or Adorama) and its little brother Platypod Pro ($49.95 from B&H and Adorama) are a great way to provide stability to your camera. But most importantly, they are extremely compact and easy to throw in a camera bag. Unlike typical tripods, the Platypods consist of a small metal base that you attach a ball head to, instead of legs. They are made from lightweight aircraft quality aluminum.
Platypod Pro Max with a Nikon D500 attached and Platypod Pro with a Fuji X100T
Max and his little brother, Pro
So before I go any further, I want to let you know that I purchased both Platypod Pro Max (Max from now on) and Platypod Pro (Pro) with my own money during their Kickstarter campaign. Platypod did not provide me with any kind of compensation for this review. So with my disclaimer out of the way, let’s take a closer look at Platypod Pro and Max.
The Pro is the smaller model and works well with mirrorless cameras and DSLRs with small to medium sized lenses. It measures 3×5”, is 4mm thick, and weighs just 3 ounces. Platypod Pro can be used with ball heads smaller than 4”. I used a Sirui G-10KX and I could easily access all the knobs on the head. However, if you have a ball head with knobs or screws close to its base, you may find that they interfere with the ¼”-20 bolt near the front of the plate. This bolt can be used to attach speed lights or other accessories to the Pro.
Platypod Pro with Sirui G-10KX ball head
Platypod Pro
Platypod Pro
The Pro model can be purchased as a kit, which gives you a few extras. Firstly you get a nylon case. The case is compact and fits the plate by itself. However, with a couple of origami-like moves, it transforms into a box that will hold a small ball head as well. In addition, the kit comes with three screws that have a sharp tip on one end and rubberized feet on the other. They can be threaded into the plate to help stabilize and level it. The kit also comes with a 1/4” to 3/8” female spigot adapter.
Platypod Pro Deluxe Kit
Max is the newest model and is substantially larger than the Pro. As such, it is capable of supporting large DSLRs with much heavier lenses. Max measures 5.25×7.75” and is 5mm thick. Weighing in at 13oz, it is substantially heavier than its baby brother, but still easily portable. I have a Sirui K-40X ball head, which is a large ball head, and it felt very balanced on Max.
Platypod Max with a Sirui K-40X ball head
Platypod Max with a Nikon D500+80-400 f/4.5-5.6 lens attached
Max ships with four two-inch long ¼”-20 spikes. Like the Pro’s spikes, these also have a rubber tip at one end and sharp points at the other. The spikes come in a neat little storage box that clips onto the top of the plate. A great feature to help prevent losing them. The spikes work well to ensure that the rig doesn’t slip. The rubber ends won’t mar delicate surfaces, like the hood of your car. Since they are adjustable, they also allow you to level Max on uneven surfaces. Max also has a pair of slots. The slots allow you to strap Max to a vertical pole or post using a belt.
Max with a Nikon D500+70-200 f/2.8 lens
Max with a Nikon D500+70-200 f/2.8 lens
So What Did I Think?
I particularly like how convenient it is to throw a Platypod into my camera bag. They hardly take up any room. When I’m shooting with my Fuji X100T or Nikon D500+kit lens (16-80 f/2.8-4 lens), I have the Pro in my bag. And if I’m using heavier lenses, I throw Max in instead.
The Platypods really shine when you need to shoot longer exposures from a low angle. In places where space is limited and it is hard to splay out the legs of a full sized tripod, the Platypods come to the rescue. With a ball head mounted to either one, it is very easy to adjust the camera angle, as opposed to simply setting your camera on the ground.
For this low angle image taken with my Fuji X100T and Platypod Pro, it would have been very hard to use a tripod without having its legs stepped on!
At night or for selfies, I can usually find an elevated surface to place my Platypod on. However, Platypods do not have anywhere near the flexibility that a tripod does. I sometimes find it frustrating when the object I want to prop the Platypod on isn’t in the right location. A tripod is easy to move a few feet to the left or right. However, moving a large boulder or mailbox is a little harder!
To get this shot I placed my Platypod Pro on an electrical box near the intersection. It allowed me to get a 1s exposure without taking up a large footprint on the sidewalk, as would be the case had I used a full sized tripod.
When you can’t find a horizontal surface to place your Platypod on, it is handy to be able to strap it to a something vertical. However, this can be a bit fiddly to do. It takes a bit of time to get the rig safely attached and adjusted properly. I found it much easier to configure the Pro model vertically than it did to strap Max to a post. With heavy gear, you want to make sure Max is not going to slip. Because I don’t usually wear a belt, I did not find it convenient to set Max vertically. On the other hand, it is easy to keep a handful of lightweight cable ties in my bag. The ties are a great way to attach the Pro model to vertical objects.
Pro with a Nikon D500+16-80 f/2.8-4 lens. Cable ties threaded through the holes work well to attach the rig to a tree.
Another benefit to using Platypods is that they can be taken to locations where tripods would be difficult to bring, or are not allowed at all. With your camera and ball head attached to a Platypod, it is easy to balance the rig on a railing, aim the camera in any direction and take the shot.
Conclusion
Platypods are lightweight and compact. They are rugged, very well made and will last a lifetime. They fit easily into a camera bag. As a piece of camera gear, they are relatively inexpensive. When was the last time you purchased a piece of kit for under $100?
They will not replace your tripod, but in a pinch, they are a great substitute.
Platypod Pro and Max are the best alternatives I have found to carrying a traditional tripod with me. They have allowed me to get shots that I would not have been able to capture without a tripod. They are an indispensable piece of kit and have earned a permanent home in my camera bag.
Landscape photographers often deal with the dilemma of choosing between different types and brands of neutral density and graduated neutral density filters for use in high-contrast situations such as sunrise and sunset, where their cameras might not have enough dynamic range to be able to capture the entire scene. While we are not going to go over each and every brand to see which one performs better, we do want to show the difference in sharpness between glass and resin filters. For this particular test, we used three 0.6 (2 stop) filters from three different manufacturers – NiSi (glass filter), Lee (resin) and HiTech (resin). The latter two are probably the two brands that are used the most among photographers in the field.
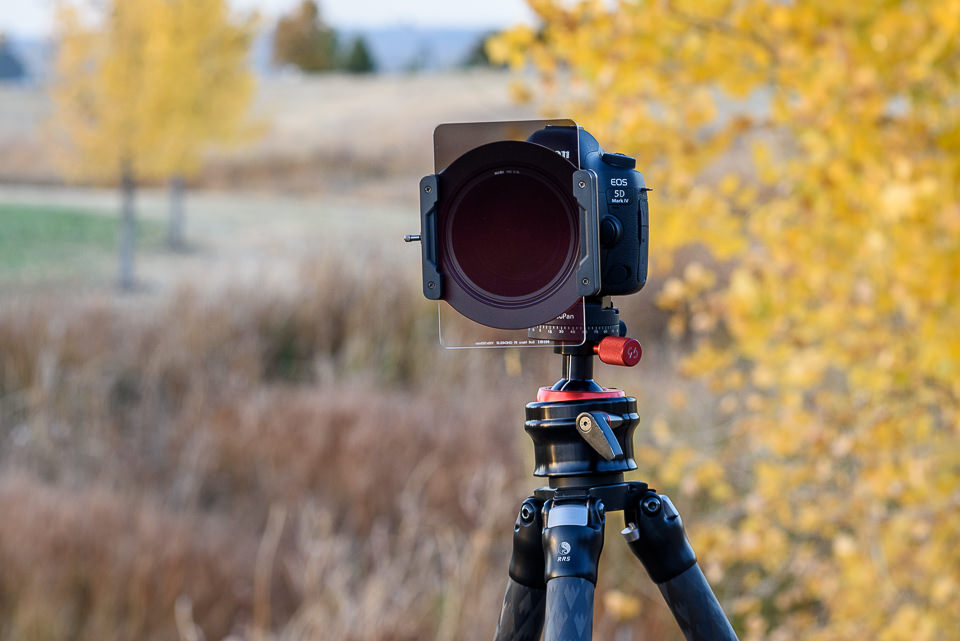
For the sharpness test, we used the Nikon 105mm f/1.4E ED, which we are in the process of evaluating for an upcoming review. The lens was mounted on the Nikon D810 and shot in Mirror Lock Up mode, with EFCS (Electronic Front Curtain Shutter) enabled, as detailed in our how to reduce camera shake on a tripod article. While the numbers are not yet final (only one sample was tested with a high-resolution chart at a very close distance, which can skew mid-frame and corner numbers), you can see that the lens looks absolutely amazing, almost Zeiss Otus-like in terms of center sharpness – definitely one of the sharpest Nikon prime lenses we have ever tested.
We stopped down the lens to f/5.6 to yield maximum sharpness (although MTF numbers at f/4 look even more impressive in some cases) and we used a few different focusing techniques to yield the best possible performance without any filters, while a NiSi filter holder was already attached to the lens. Once maximum resolution numbers were achieved, we mounted one filter at a time, without touching the focusing ring.
2 Stop GND Filters – Glass vs Resin
Below are the results from Imatest software, showcasing MTF numbers for the 2 stop GND filters:
As you can see, there is no difference between using a lens with or without a glass filter. And we have shown before in our clear filter tests, if one uses high quality glass in front of a filter, there is no impact on the lens’ resolving power. So it looks like if one uses glass filters similar to the ones from NiSi, one can get maximum sharpness from the camera + lens setup.
At the same time, take a look at what happens when a resin filter is mounted on the camera. I have been using Lee and HiTech filters for years and previously, I never really noticed much loss of sharpness in my images when using lower resolution cameras. After I started using high-resolution cameras such as the Nikon D810, Sony A7R II and Canon 5DS R, I did start noticing differences in sharpness in my images. Not to the point that would make me not want to use filters, but definitely to the point where I started wondering if perhaps my filters needed to be replaced.
The graphs above show a very typical situation when using resin filters – there is a definite and visible drop in sharpness on high-resolution cameras, even at 36 MP. As you can see, Lee’s two stop 0.6 GND (Graduated Neutral Density) filter had a pretty dramatic drop of sharpness, almost 17.5% lower in center sharpness compared to not using a filter and around 15.8% lower in center sharpness compared to NiSi’s glass filter.
Actually, the numbers were even lower when I initially mounted resin filters. Due to changes in optical path when using resin filters, I actually had to refocus my setup and see if I can get better numbers. I was able to get higher numbers in the center of the frame and due to the change of plane of focus, the change did affect mid-frame numbers as well, which is why they show up a little higher in comparison to not using a filter at all.
After testing out my Lee filter, I decided to mount HiTech’s 0.6 GND as well and see what it would yield. As you can see, although its performance looks a tad better, overall, it is really not much different compared to Lee. Center performance drops by roughly 15%, which is certainly not a small number – that’s practically worse than using a cheap circular filter in front of your lens.
Now you might be wondering, can these differences be seen in images? Let’s take a look at two crops taken from the above-mentioned tests:
Keep in mind that these tests were performed with a 36 MP camera. If I were to show you difference with 42 or 50 MP cameras, the differences would be even more apparent. Please don’t try to view these images on a small mobile device / tablet, or a large super high-resolution screen, since pixels would be packed too closely together and you would never see any differences. 15% does not look like a big number for sure, but if you look closely at edge detail, the differences are definitely there. Now if those differences are too small for you to care about, then by all means, forget about the existence of this article! However, if you do want the best edge detail your camera can provide for landscape or architectural photography needs, you might want to re-evaluate your setup and potentially look into getting resin filters replaced with glass filters.
10 Stop ND Filters – Glass vs Resin
We also decided to run another test to compare two 10 Stop ND filters from NiSi (glass) and HiTech (resin). Aside from serious color cast issues pointed out in our NiSi Filter System review, we saw a pretty dramatic drop in sharpness when comparing NiSi to HiTech filters. Take a look at the MTF numbers below:
As you can see, the NiSi 10 stop ND filter performed really well compared to the HiTech resin filter, which actually caused quite a bit of damage – practically a 30% drop in sharpness! So keep this in mind if you want to do long exposure photography. Looks like glass is the way to go not only if you want to preserve original colors (no color cast), but also if you want to keep the resolving power of your lens.
Summary
Resin filters definitely have their own advantages – they handle great in the field and if you drop them on a hard surface, they do not break like glass does. They don’t shatter under pressure, since they have the flexibility to bend. However, they are quite prone to scratches and even moderate use of resin filters can introduce small scratches all over the filter. While scratches don’t do additional damage to your images in terms of sharpness, they certainly can reduce contrast and potentially introduce more artifacts to your images when shooting against bright sources of light (in the form of ghosting and flare).
In comparison, glass filters are obviously superior in sharpness and they are less prone to scratching. However, they do require better handling in the field, so you must be able to provide good protection for them not only while transporting, but also while using. If you drop a glass filter, unless it lands on grass, you will have to look for a replacement.
Personally, I am planning to start using glass filters from now on. However, in case I do lose a filter in the field, I am planning to bring my Lee filters along, just in case :)
What types of filters do you personally use? Resin or glass? Have you tried both to see what is practical in the field? Would love to hear your thoughts in the comments section below!
For most photographers, especially those who shoot landscapes, it is crucial to have a good set of filters at your disposal. Filters come in two types: screw-on filters (attaching directly to your filter threads) and square filter systems (sliding into a holder on the end of your lens). A lot of landscape photographers move to a square filter system over time — they have a wider selection of filters, and they let you move your filters from lens to lens more quickly. The main companies that make square filter systems are Lee, Cokin and HiTech, all of which are well-known among landscape photographers. There are a few other companies in the marketplace, too, including a relatively new brand called NiSi. Recently, NiSi has been contacting photography websites for reviews, and they contacted us as well. I have used the Lee system for a while, and experienced a few problems with it, so I wanted to review these NiSi filters and see how they stack up. This review covers the NiSi filter system, along with a few specific filters.
1) About This Review
For this review, NiSi sent us two sets of filters. I took one, and Spencer took the other. We each reviewed the filter set separately and combined our thoughts (which were fairly similar) into this review. We have been allowed to keep these filters. That is always a problem with online reviews — smaller companies sometimes send out freebies to websites, and you have to take bloggers at their word that the review is honest and legitimate. That is especially true in a review like ours, which is mostly positive.
Our opinions here are entirely our own, and we only accepted the filters under the condition that we can write whatever we want about them. These NiSi filters are good, but they aren’t perfect, as this review makes clear. Here, we’re reviewing the entire NiSi system. This includes the filter holder and adapter rings, as well as the filters themselves (a polarizer, an ND grad, and a ten-stop ND filter). We go through all the pros and cons below.
2) Build Quality
The first thing you’ll notice about NiSi filter system is its build quality. As a whole, it feels fairly well-built and solid. In particular, the graduated ND filter is made of glass, and it feels very high in quality. Standard Lee’s and HiTech’s versions are made of resin, which scratches much more easily, although you can get glass filters from each company at a much higher cost.
The rest of the NiSi kit is made of aluminum. This is pretty good, but not perfect. First, NiSi’s aluminum is very thin, which makes it feel a bit cheap (Lee’s filter holder, however, is made of plastic — NiSi wins in this case either way). Also, although the aluminum has worked well so far, I would prefer brass filter threads instead. Aluminum threads don’t do as well in cold weather, and they are more prone to getting stuck on the lens. Plus, they have the tendency to wear out faster overtime (which we have not yet been able to test, but will definitely update the review in the future if it turns out to be true).
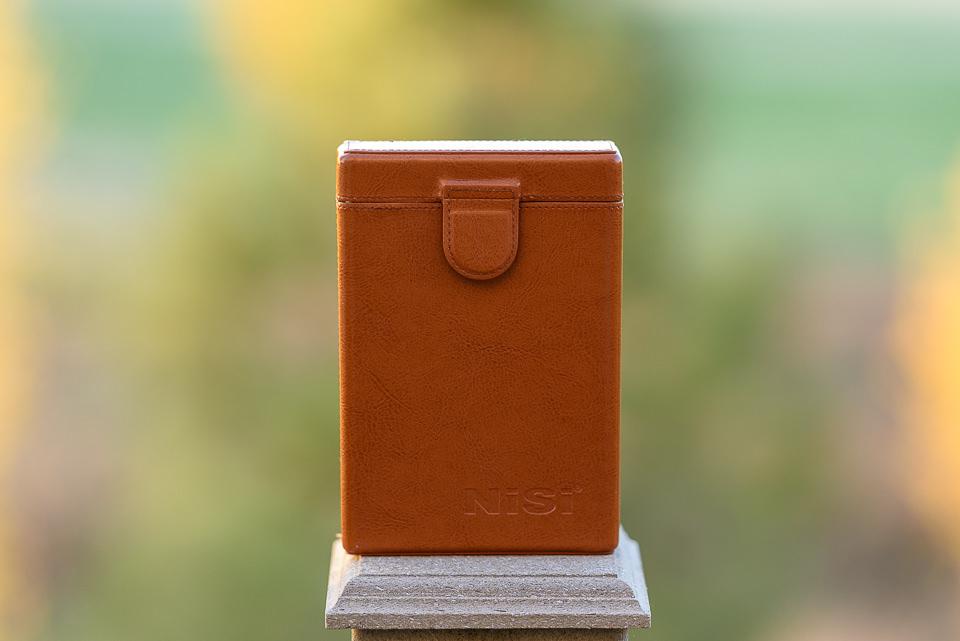
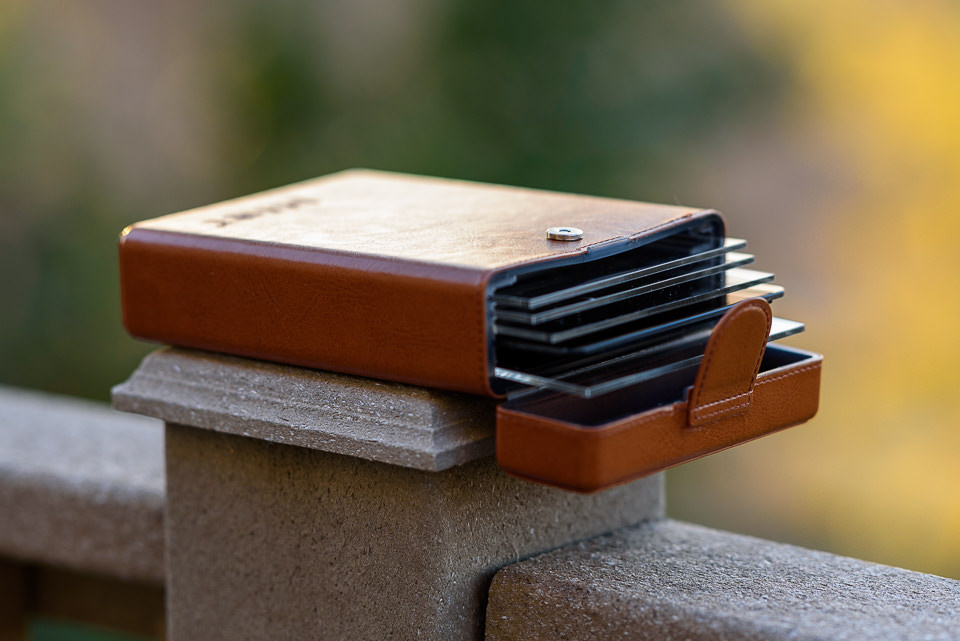
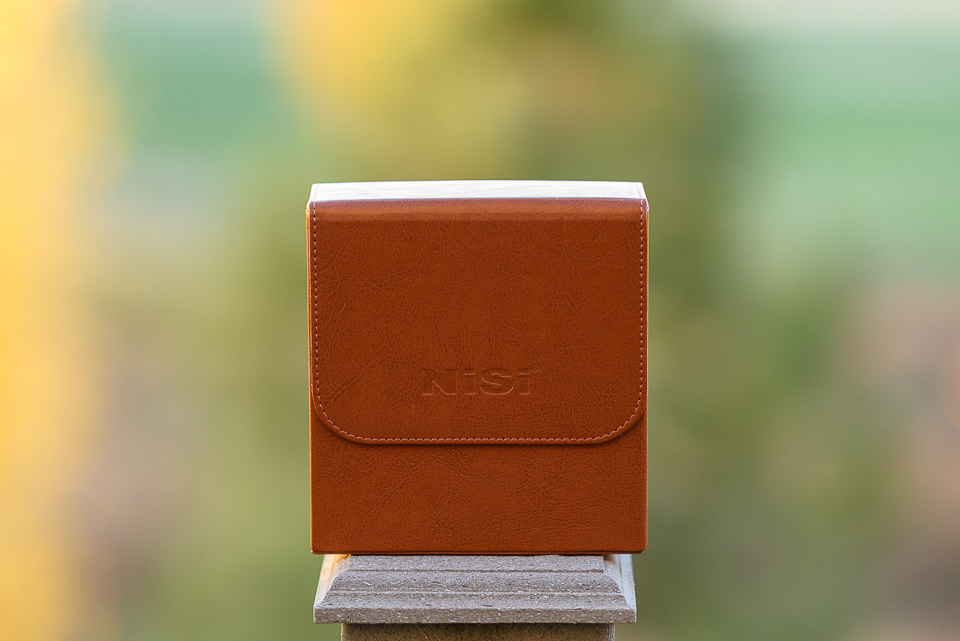
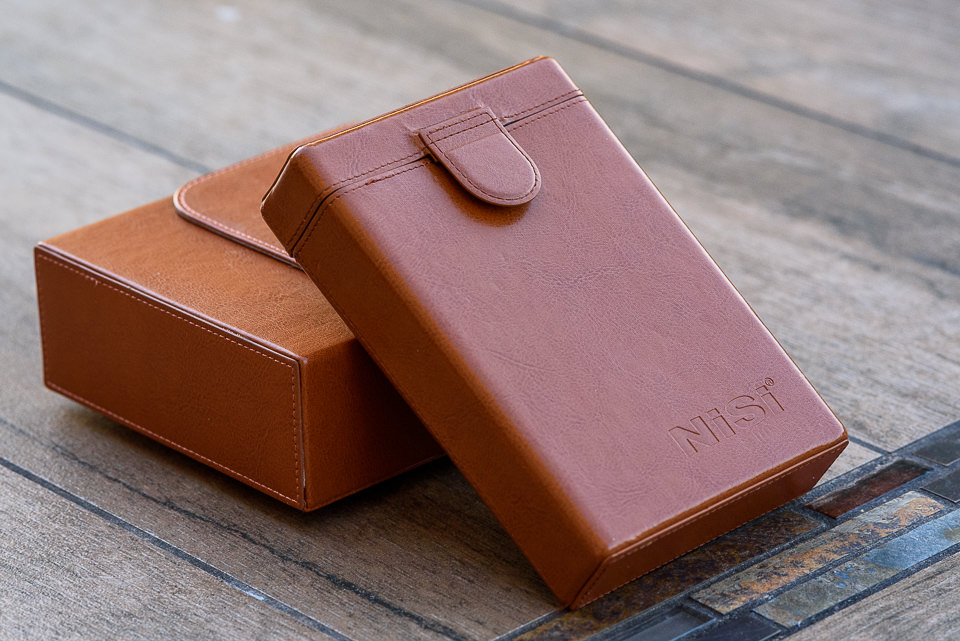
Finally, the leather carrying case for the filters is quite nice. It holds up to six rectangular filters (4×6 or 4×4), and it’s relatively small. If you use square filters, NiSi even provides plastic blank spacers for those, so that you do not have to turn the case over in order to get a hold of a shorter square filter, which is nice.
However, there is one potential problem with the filter case – while it is nice to be able to carry up to six filters, I would not recommend putting more than 4-5 in there. Partially because the case does not close as well anymore and partially because it has a tendency to bend and potentially scratch the first filter. Unfortunately, it seems like there is simply not enough reinforcement on the front of the case, which can result in its bending, as seen below:
The front of the case has a tendency to bend, which can potentially damage the first filter.
My case developed this behavior after several trips, although Spencer’s sample seems to be a bit better for now. If additional pressure is applied to the bent side, it can certainly break the first filter. And even if it does not, the magnetic button on the front has two mounting brackets on its back, which can certainly scratch even a glass filter. I wish NiSi reworked the case and found a way to provide additional protection and eliminate anything inside the case that might scratch filters overtime.
Overall, aside from the above-mentioned issue, the build quality of the NiSi equipment is quite good. As a whole, it is noticeably better than Lee’s, although not worth making the switch in and of itself.
3) Assembly
When you first try to set up your NiSi filter system, it can seem a bit counter-intuitive. That’s because there are a few important differences between NiSi and Lee filters. Assembling the filter system takes four steps:
3.1) Step-Up Ring
Unless you have a lens with an 82mm filter thread, you need a step-up ring to 82mm, as that’s the native size of the filter holder. The full NiSi system comes with three step-up rings: 67mm to 82mm, 72mm to 82mm and 77mm to 82mm. If any of your lenses has a different filter thread size, you’ll need to buy your own step-up ring to 82mm. The step up rings, along with the NiSi filter holder can be all stored in a larger leather case, as seen below:
3.2) Adapter Ring
Once you’ve attached the 82mm step-up ring, you can screw the “82mm adapter ring” onto your filter threads. The name “adapter ring” can be confusing, because there are a lot of rings involved in setting up a filter system. This adapter ring isn’t actually the piece that holds your square filters — this is what the square filter holder clamps onto.
There is one difference so far between NiSi filters and Lee filters. For Lee filters, the adapter ring (again, what the square filter holder clamps onto) doesn’t have a built-in 82mm filter thread – it comes in all sizes. You need to buy a separate adapter ring for each one of your lenses. My three main lenses, for example, each have their own filter thread sizes: 58mm, 67mm, and 77mm. So, I need three adapter rings as well — one for each size.
As explained above, NiSi is different. Instead of needing three adapter rings, I need three 82mm step-up filter threads, and only one adapter ring. I prefer the Lee system’s simplicity, but there is a good reason why NiSi does it this way: it allows for a built-in polarizing filter!
3.3) Polarizing Filter
This is the interesting part. Because of its design, NiSi’s adapter ring has a built-in way to attach a slim polarizing filter. This fixes one off the main problems with the Lee system — easy use of polarizers. With Lee, there are three ways to use a polarizer:
Attach a polarizing filter onto your lens, then attach the adapter ring directly onto the polarizing filter. This is a bad option, because it creates a lot of vignetting on wide-angle lenses. It also makes the polarizer almost impossible to remove from your lens — any time you try to spin it off, you end up just rotating the whole system instead. I tried this for a while, and it was a nightmare.
Instead, you can use Lee’s “105mm adapter” to attach a huge, round polarizing filter onto the very end of the filter system. In theory, this works well. However, it makes your filter system much larger, and it also can cause vignetting. Now that my widest lens is a 20mm rather than a 24mm, the vignetting is too strong, and this option no longer works (yes, I still use a polarizer on my 20mm lens – mostly for forests and waterfalls rather than blue skies, which turn uneven in brightness when you use a polarizer on a wide-angle lens).
Finally, you can use a square polarizing filter that slides into your Lee holder exactly like any other square or rectangular filter. There are two problems with this approach, although this is what I have been using with my own Lee system. First, it takes up one of the slots in your filter holder – not ideal when you need to stack several filters. Second, and more importantly, you no longer have the ability to turn the polarizer at any angle you want. Instead, you have to rotate the entire filter holder at once. This is a huge problem when you’re using a polarizer and an ND grad at the same time (you may want them rotated in different directions, which is impossible).
The NiSi system fixes these concerns, although it adds a small problem of its own.
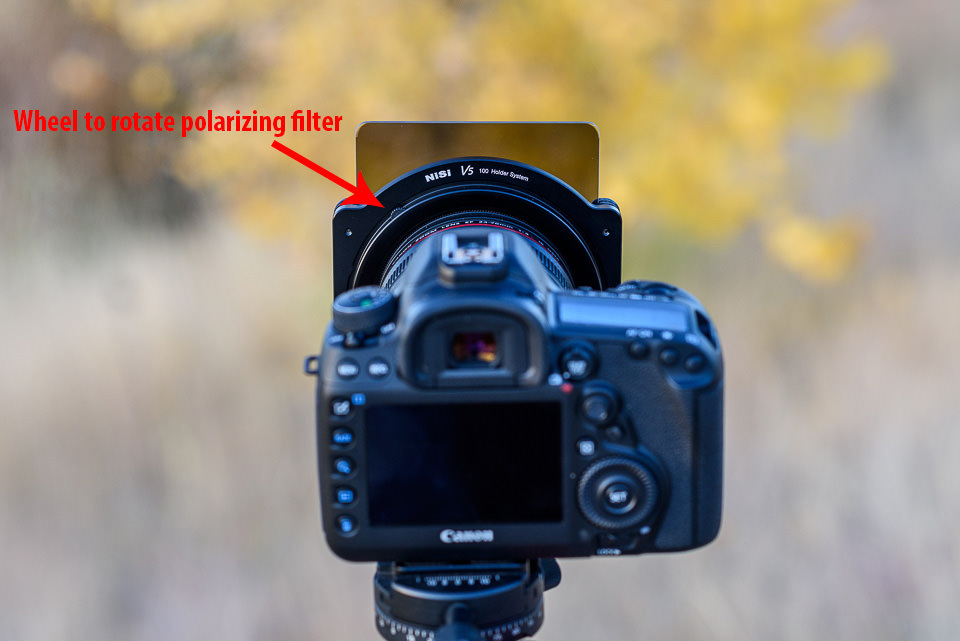
So, how does the NiSi system work? Interestingly enough, there is a small wheel on top of Nisi’s “adapter ring” that actually lets you spin the polarizing filter! I am a big fan of this design. It lets you rotate the polarizer at any angle, and it takes up less space than any of the Lee options:
The one problem is that this polarizer adds another ring that you have to screw in. The polarizer saves space, but it makes things a bit more complicated. If you haven’t used the NiSi system for very long, it can be difficult to remember how to assemble and reassemble it. The Lee system might be simpler and more intuitive to assemble in comparison, especially for a first time user.
Still, on balance, this is an improvement. If you’re looking for a reason to switch from Lee to NiSi filters, this is it – the polarizer simply has a better design.
3.4) Filter Holder
Last is the filter holder itself. There isn’t much to explain here, as it is pretty much exactly like the Lee system. The filter holder has a small knob on the side, which you pull out as you’re placing the filter holder onto the adapter ring. Let go of the knob, and your filter holder stays in place.
4) Ease of Use
This is a double-edged sword. On one hand, as explained above, the polarizer is incredibly easy to use. The small wheel at the top of the adapter ring is a great design. I wish that all polarizers spun like this. However, the sheer number of rings in this system means that everything feels more convoluted than the Lee version. It isn’t any larger – in fact, it saves a bit of space and weight. It’s just more to keep track of in our opinion. Also, it takes a bit more time to swap your filter holder from lens to lens. With the Lee system, you just need to unclamp and clamp the filter holder; here, you need to unscrew and then screw in the adapter ring. Confusing? It’s a bit easier in practice, but still not as simple as the Lee system.
Lastly, NiSi’s filter holder itself doesn’t clamp as easily as the Lee system. What do I mean by that? If you’re trying to use any rectangular filters, it can take a moment before you get the square filter holder to attach properly to the adapter ring. I don’t know why this is the case — Lee’s is easier and quicker to use. However, this isn’t a major problem, just a minor annoyance.
In the end, Lee wins out in simplicity, but NiSi is still very usable. A few minor tweaks would even out the differences.
5) Optical Tests
As we have shown in our glass vs resin filters article, high-quality glass filters definitely outperform their resin counterparts. We have tested NiSi’s glass filters and they turned out to be superior to both Lee’s and HiTech’s resin filters. Let’s take a look at some of the comparisons between different filter types.
5.1) Two Stop (0.6) GND Filter Comparison
Here is a comparison of MTF results produced by Imatest, comparing the different types of 0.6 GND filters from NiSi, Lee and HiTech:
As you can see, NiSi filters practically do not cause losses in sharpness, whereas both Lee’s and HiTech’s resin filters showed up to 17.5% image degradation. Such optical performance might not be easy to spot on low resolution cameras, but once used on high-resolution cameras such as the Nikon D810 and Sony A7R II, the differences can become quite obvious.
At Photo Plus New York, NiSi showcased its glass filters and compared them to filters from Lee and Hitech. Their setup showed the performance of a NiSi glass filter using a special device, as seen in our interview below:
Obviously, the test was exaggerated quite a bit to make NiSi look good, but still, it made us want to check if their claims were actually true. After testing NiSi filters, we came to conclusion that their glass filters are indeed superior to most popular resin filters on the market. However, this also does not mean that NiSi has something to offer that Lee or HiTech do not – both companies actually offer their versions of glass filters, although at a higher price premium. HiTech’s 0.6 GND Firecrest filters are made from 4mm thick Schott glass, which is basically as good as a filter can get. At $350, however, it is over 2x more expensive, making such filters cost-prohibitive for many photographers out there.
5.2) 10 Stop ND Filter Comparison
For our next test, we compared two 10 Stop ND filters from NiSi and HiTech. If you have experience shooting very long exposures, you probably know how images can get hurt with most resin filters, since they introduce quite a bit of color cast. Pretty much every resin filter that I have personally tested from Cokin, Lee and HiTech has always had color cast issues – some are on pinkish side, while others add a lot of green and blue color casts to images. How does the NiSi 10 stop ND filter compare in such cases? Let’s take a look at the following two images:
The image on the left is produced by NiSi’s 10 stop ND filter, while the image on the right is produced by HiTech’s 10 stop ND filter. See the difference in color? That’s not white balance – that color change is purely the result of the resin filter! When I first saw this in the field when testing out HiTech filters, I was really shocked to see such blue-rich colors. In all honesty, I don’t understand why companies like HiTech even sell such crappy filters, because it is impossible to take care of extreme color casts in post-processing. Even if you move your temperature slider towards oranges, it is not just the blues that are affected – this filter adds a bunch of green and red colors as well. You pretty much get the whole color spectrum added to your images and it is pretty bad! Glass filters and specifically the NiSi 10 stop ND filter here, do not have such problems. As you can see, the colors appear natural and there is not even a hint of color cast in the image.
What about sharpness differences? Well, that’s where it is a double loss for resin filters. Just take a look at the below MTF comparison:
Yikes! You might be wondering what happened here. Well, resin happened. As you can see, even with a 10 stop ND filter, NiSi performs really well. There is a slight loss of sharpness in the center, but it is not something you would be able to see in images. Mid-frame and the corners are definitely impacted and that’s expected when a filter is cutting down so much light from entering into the lens. However, that’s nothing compared to what happens with a 10 stop ND resin filter – look how bad that HiTech filter does in comparison. That’s practically a 30% drop in sharpness. Not only does the HiTech filter add nasty color casts, it also does massive damage to image sharpness!
5.3) Polarizing Filter Comparison
Lastly, we wanted to see how good the provided glass polarizing filter is when compared to a high-end polarizing filter from B+W, specifically the B+W Kaesemann 82mm MRC Nano, which by itself costs around $135. After going back and forth to measure sharpness between these filters, we could not spot any noticeable differences in performance – the difference was less than 1-2%, which falls into margin of error. So the NiSi filter seems to be as good as the B+W filter in terms of not impacting image sharpness.
However, there are a few important points to add here. First of all, the B+W filter can be mounted independently on any lens with a 82mm filter thread, whereas the thin 82mm NiSi filter can only be used on the NiSi filter holder. Second, the B+W Kaesemann polarizer does not reduce as much light going into the lens – in our tests, we saw approximately 1 full stop of light loss. The NiSi polarizer, on the other hand, had much more light loss – approximately 1.3 to 1.5 stops of light loss in comparison. Third, the B+W filter has noticeably better coating, which does not add as much ghosting and flare to images as the NiSi filter. And lastly, the B+W filter is made from high quality metal and brass filter ring, whereas the NiSi polarizer feels quite cheap in comparison with its lightweight aluminum construction. In short, you definitely get what you pay for with B+W polarizers. But how useful are all these features if you cannot use them with filter holders? That’s where the NiSi polarizer comes in and for that, it does a pretty decent job!
NiSi’s large carrying case for the filter holder and adapters
6) Filter Gradation
Our friend Simone Conti pointed out an interesting observation about NiSi filters that was worth looking into – he said that the gradation of the GND filters was a bit too long when compared to Lee filters. I decided to investigate this issue further and see what he meant, so after I got back from Photo Plus, I put both Lee’s and NiSi’s 0.6 GND filters side-by-side to see what he meant. Indeed, the gradation on the Lee filter appears to be much more sudden. Basically, the filter starts out transparent on the bottom, then the middle of the filter is where the filter softly switches from transparent to 2 stops darker. From just a little higher all the way to to the top, the filter stops about the same amount of light.
In comparison, NiSi’s gradation appears to be much more spread out – the filter starts transitioning in the center and gets progressively darker towards the top edge. There does not seem to be a set “boundary” or a threshold to this gradation in the middle of the filter like on the Lee filter, so it just gets its 2 stop darkness only towards the very top of the filter. This might not be a big deal for most photographers out there, but I would certainly prefer to see NiSi modify the filters, so that the transition happens in the middle of the filter, rather than gradually spread across half of the filter height. Why would this be a potential issue? Well, the NiSi filter simply makes it harder to see exactly where to stop the filter when looking through the viewfinder or composing via live view. The smoother / more spread out gradation can work out great for some environments where one perhaps desires to slowly transition from one area of the frame to another (which can be especially useful when photographing cityscapes with tall buildings and mountainscapes with high peaks), but considering that it is only a two stop filter, I do not think it would be that much of a concern in most situations. Personally, I prefer the gradation to occur in a smaller area in the center of the filter.
7) Other Concerns
A few other reviews online have mentioned that NiSi filter holder slides directly onto the lens (with foam to keep it in place) rather than screwing onto the filter threads. This is no longer the case. For all the versions currently sold, NiSi filters are like the Lee system – they attach via your filter threads. This seems like a much better option, and the old version was resulting in a lot of negative reviews. It seems that NiSi listened to their feedback and redesigned the system.
Also, a lot of people may be wondering if the NiSi system works for ultra-wide lenses without filter threads, like the Nikon 14-24mm f/2.8G. The short answer is yes, but anyone who uses these lenses knows how difficult it is to find a good filter set. Here, you need much larger filters (150mm rather than 100mm) and an entirely different filter holder system if you want it to work. We didn’t test that particular system, so we can’t provide our perspective at this time.
8) Verdict Against the Lee System
For some people, the NiSi system has some noticeable improvements over the Lee filter system. First, the build quality is better, which is certainly nice. Especially with the carrying case, the NiSi system feels a bit more complete. But, more importantly, the polarizing filter situation strongly favors NiSi. This is why both Spencer and I are sticking with the NiSi system from now on. There aren’t huge differences between the two, but NiSi just makes our lives a lot easier when we need to use a polarizer and a grad filter at the same time (which happens relatively often for our landscape work).
Here’s what we would say — if your polarizing situation with Lee is bothering you, it may be worth the switch. Otherwise, there is no reason to switch from Lee, because there really aren’t that many differences between the two holders. If you are just starting out, either is a good choice. We cannot conclusively recommend one over the other. The Lee system is simpler and quicker to use, but the NiSi system is better-made and handles a polarizing filter more elegantly.
Remember, too, that you can swap out the rectangular filters between these two systems without a problem. So, if you prefer, you can use a filter holder from one system and actual filters from another, which is great! Actually, given how well glass filters from NiSi perform compared to Lee, that might be an excellent choice for those who want to keep their Lee filter holders, but want to stay away from resin.
Ultimately, not taking price into account, both systems are very similar. If you need a square filter system, you can’t go wrong either way.
9) Price Comparison and Conclusion
Filter systems like this are sold as components, not as a whole set. Here are the links to each of the NiSi items mentioned in this review. NiSi is primarily sold through Amazon, although you can now find it at B&H Photo Video as well:
NiSi filter system, $158 (Includes 67mm to 82mm, 72mm to 82mm, and 77mm to 82mm step-up filter threads. Also includes NiSi’s adapter ring, polarizing filter, and square filter holder).
Is this cheaper or more expensive than Lee’s system? Ignoring the leather case, which I recommend regardless of the filter system you use, NiSi is noticeably less expensive than Lee. Here, are the total costs:
Clearly, Lee is more expensive for a comparable filter lineup. Without the cost of the leather case, the NiSi system is $441. A comparable Lee system is $605 (or $635 if you have the wide-angle adapter ring) and it does not come with all the adapters that are included with NiSi. That’s a large difference for such similar products. Because of this, I am inclined to recommend that a beginner goes with the NiSi system instead of the Lee system. But, if you already have the Lee system and don’t have a problem with your polarizers, there’s no need to jump ship.
Hopefully, this helped you decide if the NiSi filter system is right for you. It isn’t perfect, but a lot of people will see benefits here that Lee doesn’t provide – and vice versa. It’s all up to your specific needs.
I set out with a goal to find the best outdoor camera bag. For the most part all of these bags turned out to be pretty great bags with different strengths. To try out the bag it needed to hold at least one pro body, a wide angle zoom, normal zoom, telephoto zoom, flash, tripod and accessories. My kit was a Nikon D800, 17-35mm f/2.8, 24-70mm f/2.8, and 70-200mm f/2.8. Let’s take a look at a number of different outdoor camera bags and see which one is the most versatile option for shooting outdoors.
1) MindShift Gear rotation180° Professional Deluxe
Weight: 6.2 lbs
Capacity: 37.5 liters
NX1 + NX 16-50mm F2-2.8 S @ 22mm, ISO 200, 1/160, f/4.0
Pros
Rotating belt pack for camera access without taking the pack off
Very rugged and durable feeling
Well-padded shoulder straps and hip belt
NX1 + NX 16-50mm F2-2.8 S @ 22mm, ISO 100, 1/100, f/5.0
Cons
If you don’t attach the clip-in strap on the belt pack it can fall out of the pack if you don’t have the hip belt buckled
Not the best looking pack of the bunch
Almost seems a little overbuilt
NX1 + NX 16-50mm F2-2.8 S @ 16mm, ISO 100, 1/50, f/5.0
NX1 + NX 16-50mm F2-2.8 S @ 24mm, ISO 400, 1/160, f/4.0
Pros
Lots of pockets
Plenty of dividers to organize the camera compartment
Great for plane travel
Nice understated aesthetic
NX1 + NX 16-50mm F2-2.8 S @ 20mm, ISO 125, 1/100, f/4.0
Cons
No back panel access
Not the best for long hikes
Get the Gura Gear Bataflae 32L if you are a travelling photographer who needs a bag that holds a lot of camera gear and if you love having lots of pockets. This is my favorite bag for airports and plane travel.
3) F-stop Tilopa BC
Weight: 3.95 lbs (Not including ICU)
Capacity: 48 Liters
NX1 + NX 16-50mm F2-2.8 S @ 22mm, ISO 100, 1/250, f/4.0
Pros
The most comfortable pack I tested
The only storage compartments I was able to organize exactly how I wanted
Customize how much camera gear you take with different ICU’s
Plenty of options for tripod and accessory attachment
NX1 + NX 16-50mm F2-2.8 S @ 20mm, ISO 100, 1/250, f/4.0NX1 + NX 16-50mm F2-2.8 S @ 16mm, ISO 100, 1/160, f/4.0
Cons
No water bottle spot (this was fixed in the updated Tilopa that was just released)
Get the F-stop Tilopa BC if you want a well built, comfortable bag for hiking that can handle a lot of gear. I used the small pro and medium slope ICU’s This is my favorite bag from the test.
4) Clik Elite Contrejour 40
Weight: 5.25 lbs
Capacity: 40.1 liters
NX1 + NX 16-50mm F2-2.8 S @ 18mm, ISO 125, 1/80, f/4.0
Pros
Plenty of space for non-photography gear
Back and side panel access
Tablet sleeve
NX1 + NX 16-50mm F2-2.8 S @ 20mm, ISO 125, 1/125, f/4.0
Cons
Photography equipment dividers are not stiff enough to keep photo gear from moving around
Too tall to qualify as a carry-on bag
Get the Clik Elite Contrejour 40 if you need a bag with dedicated room for non-photography gear.
5) Mountainsmith Parallax
Weight: 6.75 lbs
Capacity: 30.5 liters
NX1 + NX 16-50mm F2-2.8 S @ 18mm, ISO 100, 1/80, f/5.0
Pros
Lots of pockets
Chest carrier built in
Access to camera without removing backpack
Back panel access
NX1 + NX 16-50mm F2-2.8 S @ 22mm, ISO 100, 1/100, f/5.0
Cons
I would’ve liked the back panel access to be a little larger
Get the Mountainsmith Parallax if you need a bag that is great for travelling and is an excellent value.
6) Conclusion
So what bag do I reach for most? Definitely the F-Stop Tilopa BC for two main reasons. It is the most comfortable and it has the camera compartment I like the most. It also doesn’t hurt that I can attach two tripods and a slider to the outside. It is really an amazing bag.
If you don’t want to spend the money for the F-Stop Tilopa BC, I think the Mountainsmith Parallax is the best value, coming in at under $200. The camera compartment was pretty good and I really liked the removable chest carrier. I just didn’t think it fit quite as well as some of the other bags (I’m 6’1” so that might have something to do with it).
All of these bags have their place and have some amazing features so I don’t know that you can really go wrong with them. I will say that the Clik Elite bag was my least favorite due to the camera compartment dividers not being stiff enough.
A couple of weeks back, AT&T sent me a ZTE Spro 2 Smart Projector to review and give away to one of our readers. I loved the idea of doing this, not only because it is a neat little smart device that you can use as a mobile hotspot and as a projector, but also because with the holiday spirit, why not gift one of these away to one of PL’s readers? After-all, our site is all about giving! Speaking of gifts, hope you’ll get what you need this holiday season, because it does not always happen. What do you do with those unwanted gifts then? I find regifting to work the best. For example, on my birthday earlier this year I received a gift card to a store I never shop from, so I decided to regift it to a friend who does. Worked out nicely and I did not even have to think much about buying a present! Now the question is, if you win this giveaway, will it be a keeper? Anyway, before I go into the giveaway details, let’s take a closer look at what the ZTE Spro 2 is capable of and what you can use it for.
ZTE Spro 2 Overview
In a nutshell, the ZTE Spro 2 is an Android-powered portable projector that can be also used as a mobile hotspot for connecting up to 10 devices via WiFi to a 4G LTE network (the particular unit that I am reviewing and giving away is specifically for the AT&T network). It is a smart device with a 5″ touchscreen, which means that you can use it just like an Android-based tablet to check email, browse the web, watch movies, play games, etc. Although ZTE describes the Spro 2 as a “2-in-1 projector and mobile hotspot”, I would instead call it a “3-in-1 projector, mobile hotspot and tablet”, since the latter is an integral part of this portable device. So when not using it as a hotspot or a projector, you can still connect to the Internet via a mobile connection (requires a data plan) or WiFi, which is really neat. The only downside on the “smart device” side is that the unit ships with the older Android 4.4 “KitKat” OS and not the current “Lollipop” version, so you might miss some of the apps specifically designed for Lollipop on the ZTE Spro 2. Featuring a fairly powerful Qualcomm Snapdragon 800, the device should be able to technically run Lollipop, but there might be technical challenges to get all the components, including the projector working on the new OS. I might be a matter of time until folks at ZTE can get the Spro 2 working with the latest and greatest Android OS, but even if that never happens, I don’t think I would be very disappointed, as the highlight of the device is definitely the projector + the hotspot and not the tablet features…
As you will see further down in this review, the ZTE Spro 2 has a wonderful and compact built-in projector capable of outputting up to 720p video in 4:3 or 16:9 aspect ratio, which given its compact size (5.3″ H x 5.2″ W x 1.2″ D) and light weight construction (only 19.4 oz / 0.55 kg) is pretty darn impressive. That makes the device a nice travel companion – you can carry one in your camera bag when traveling! And when you are ready to project, all you have to do is press the power button, then touch the “Project” button on the touchscreen and voila – you are projecting. With a lamp life rated at 20,000 hours, the projector should last quite a while.
The ZTE Spro 2 can be purchased either in a WiFi-only or LTE + WiFi package. The LTE + WiFi package is the way to go in my opinion, because you can use it as a hotspot to connect all of your devices (like your smartphone, tablet and laptop) and share the Internet connection, which is particularly useful on the road. You will need to activate a SIM card with the carrier and once you do that, all you have to do is enable the hotspot feature through the Settings menu to be ready to accept connections from other devices.
So what would you use the ZTE Spro 2 for? If you are a videographer, the device could be used for video presentations. Being able to fire up a projector and show a video to your friends, family or co-workers on a huge wall is really cool. You don’t have to worry about finding a huge TV and you can sit back together with the audience to present the material. Although the video resolution is limited to 720p, which means that you can only output at a maximum resolution of 1280×720, you can still use the ZTE Spro 2 for showcasing your photos as well. The colors and the details might not look the best, but at the right viewing distance, it actually does not look bad at all, as you will see below.
Construction and Build Quality
The ZTE Spro 2 for AT&T has a high-quality exterior plastic shell colored in dark blue, with the exception of the glass touchscreen area. All corners are nicely rounded and there is nothing sharp on the unit that could potentially scratch other devices. Although the 5″ touchscreen seems to be made out of tough glass, I would recommend to keep it away from sand and other sharp objects that might scratch the screen. Store it in the provided ZTE case when not in use and if you want to avoid any potential of scratching, it might be best to use a screen protector. The same goes for taking care of the front of the unit where the projector sits. The projector front lens is protected by a single piece of glass and if you manage to heavily scratch that glass or make it extremely dirty, it will affect the projecting performance of the unit.
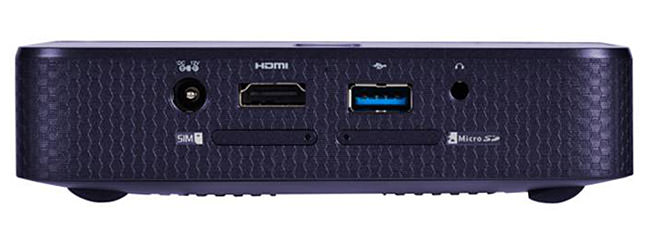
On the left side of the unit you will find two buttons for adjusting volume, while the right side only has a small venting area. The bottom of the unit has a well-vented black plastic shell where you will find four soft rubber feet, a small kickstand and a tripod socket for mounting the unit. The rear of the device has all the connection ports, which includes power input, HDMI input, a USB 3.0 port and a headphone / speaker output plug. Right below those ports you will find two additional ports – one for inserting a SIM card and one for a MicroSD card (the device supports MicroSD cards up to 64 GB in size):
The 5″ touchscreen has a resolution of 1280×720 at 294 PPI (921,600 dots), which can be set to be quite bright. Fonts, imaged and videos look great and the touchscreen is very responsive, having a very similar feel as what you get on a high quality smartphone.
Overall, the ZTE Spro 2 feels like a quality device that is built very well. Without serious abuse, the device should last a while.
Battery Life and Memory
The ZTE Spro 2 comes with a large capacity 6300 mAh battery, which according to ZTE should provide up to 2.5 hours of continuous projection. That’s plenty of time to watch a full-feature movie and still have some time left to project. In fact, on a fully charged battery, I was able to squeeze over 3 hours of projection, which is really nice! And if you utilize the device itself without using the projector, say for the hotspot or tablet functionality, you can expect to get much more running time – up to 16 hours!
The device comes with 2 GB of internal memory (RAM) and 16 GB of storage space (ROM). While 16 GB does not sound like a lot for storing music and movies, keep in mind that you can easily expand the storage with a 64 GB MicroSD card. And if you find that limiting, no problem – just use an external USB drive! I connected my Samsung T1 Portable SSD drive and after a couple of seconds, the Spro 2 showed the drive contents to me. I was able to browse the folders and play back photos and videos I had on the device. The SSD drive was NTFS-formatted, but if you have Macs in your environment, the device will be able to read HFS+ formatted drive contents as well. So you don’t have to worry about constantly fiddling with the MicroSD port to copy / access your media – just use an external hard drive and you are all set.
LTE, WiFi and Bluetooth
The ZTE Spro 2 ships with LTE-capable antenna, so you will be able to access the network at very fast speeds (Frequencies: 850/1900/2100MHz, LTE bands 2/4/5/17). So if you are near LTE towers, you should not have to worry about network speed issues, particularly when sharing data across multiple devices. As for WiFi, the device supports 802.11 b/g/n networks at 2.4Ghz and 5 Ghz, which is more than plenty. And lastly, you can connect your devices to the Spro 2 via Bluetooth 4.0.
Projector Output
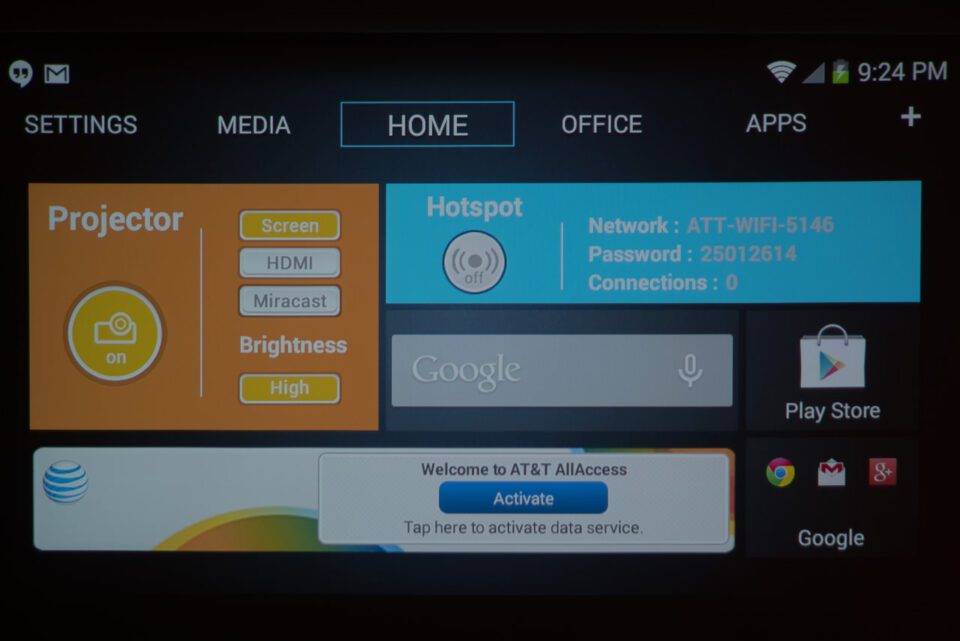
When using the Spro 2 on battery, you can project up to 10 feet with 100 lumens. Not super bright, but if you do it in a dark environment, it actually looks pretty decent. If you have a power outlet, you can double the brightness to 200 lumens, which is more than enough to bring small theater-like experience to a room. I was actually quite surprised by the brightness and quality of the projector output when using it in my home environment. At first, I thought 720p would look pretty average on a large projection, but after I fired it up, I was pleasantly surprised by how good 720p actually looks when properly focused. Here is the main screen of the device that I output on a large bedroom shade (which worked out great, by the way!):
ZTE Spro 2 Main Screen
There is a bit of pixellation seen at very close distances, but come on – projectors are not meant to be seen with a loupe! At the right viewing distance, the image looks quite detailed and nice.
So what did I view next? I fired up the YouTube app and launched the Star Wars Episode 7 trailer of course! I am super excited about the premiere on the 17th and although I was not able to get tickets for the first day, I have the tickets for the morning of the 18th – my boys are pumped up and are counting days :) Not bad at all:
Projecting Episode 7 Trailer
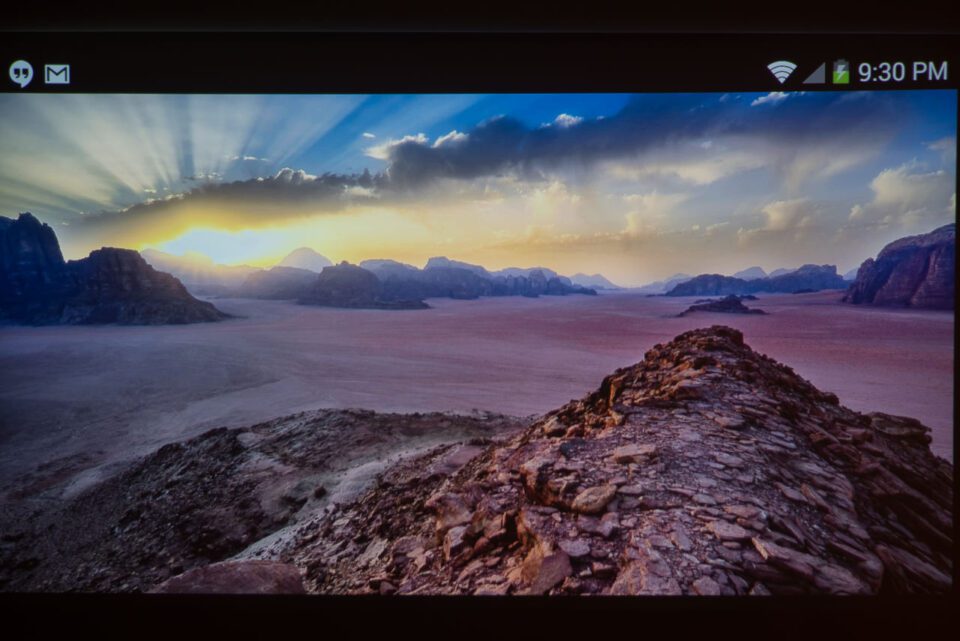
Next, I opened one of my images to see how it would display:
Projecting a JPEG photo
The image was obviously downscaled to fit and it actually looked pretty decent. You can definitely use a projector like this for presenting images, but keep in mind that the colors and the tones are not going to be very accurate. Plus, if you move the device too far back and the room is not completely dark, brightness might not be sufficient to bring out all the shadows in images. Still, I expected a lot worse from this small of a projector, so I was very happy to see the results.
Focusing with the projector is very easy and there is no manual focus ring to fiddle with – everything is done electronically. Under the Settings menu, you will find a “Projector” icon. From there, you can select your video source (Screen, HDMI or Miracast), Brightness Level, Focus and Keystone. By default, Brightness is set to Medium and when on battery, you cannot move it to “High” – for that, as I have already mentioned above, you need to be plugged in to a power outlet. On my unit focusing was set to Auto, which worked out pretty well, but every once in a while the image would refocus, so I switched to Manual focus. Adjusting focus position is super simple: there is a plus and a minus sign and you move focus whichever way to make the image sharper. The Keystone feature can also be set to “Auto”, which is what I left mine at – it automatically corrects angular distortion to make the output look nicely rectangular. This is great, because you are not expected to always project at a particular angle. You could set the unit fairly low and project higher up or vice-versa and the projection always looks rectangular thanks to this feature. Another great feature I did not expect to see from such a compact and relatively inexpensive unit.
In addition to all of the above, you have all kinds of other tweaks in the Projector settings menu. You can lower power consumption by maintaining constant image brightness, brighten darker image areas to improve overall picture quality, adjust color correction options and even stabilize the projected image with an “anti-shake” option.
In summary, the projection capabilities of the ZTE Spro 2 are very impressive!
HDMI Input and Sound
If you enjoy playing games or watching movies, there is nothing like hooking up a laptop or a game console like Xbox, PlayStation or Wii via HDMI and entertaining yourself or your guests on a giant screen. I am not a gamer anymore, but I did watch some video clips with my family, which they enjoyed a lot! Now I am looking forward to watching a movie. If you have a Roku, or a Chromcast device for video streaming, you can attach those devices easily. You don’t even need to mess with extra power cables for hooking up a Chromcast unit or even a Raspberry Pi – the device provides enough USB power to power those up. To make the projection look brighter, I hooked up the unit to an outlet, which made a huge difference. My only gripe is the fan noise – to keep the projector cool, the unit fires up a pretty loud fan, so make sure that your speakers are louder than the fan noise, or you might get a bit annoyed.
Connecting a Surface Pro 3 or the newer Surface Pro 4 to the Spro 2 is a piece of cake, but you will need a special adapter to convert Mini DisplayPort to HDMI. You can get the accessory from your local electronics store like Best Buy or purchase one directly from Microsoft.
Speaking of the sound output, the built-in speakers on the Spro 2 are pretty loud, but if you are watching a movie, I would recommend to hook up external speakers. That’s what the rear 3.5mm audio jack is for – you can use headphones to go completely silent for your own enjoyment, or you can hook up more powerful speakers when watching with a group of people.
ZTE Spro 2 Giveaway
Now that you are hopefully pumped up about this device, it is time to discuss the giveaway! Yes, we will be giving away a brand new ZTE Spro 2 Smart Projector ($500 value) to one lucky reader. To participate, all you have to do is leave a comment in the comments section below with an answer to the question “How would you use the ZTE Spro 2 if you were to win it?“. We will randomly select 5 readers and choose a single winner among them based on their comment. So don’t just leave one or two words!
Please see the following giveaway rules:
Giveaway is only open to US and Canada residents
Participant must be 18 years and older
Only one comment per participant
The winner will be announced shortly, on December 15th, 2015!
AT&T’s 12 Days of Giving
In addition to our giveaway, AT&T is currently hosting its “12 Days of Giving” program, where the company is promoting special deals every day for 12 days straight. The program started on November 30th and will stop in 4 days, on December 11th. Check out the link above to see the details. In addition to this program, AT&T is also hosting its #ATTGiftSweeps Holiday Sweepstakes, giving away all kinds of great prizes for 12 days straight between December 1st and 12th. To see the prizes and to participate in these sweepstakes, head over here. AT&T is giving away way more stuff than we are!
For as long as I can remember, ever since I bought my first DSLR I’ve been looking for “the perfect” casual camera backpack. For me, that means a backpack that I can take anywhere, that’s easy to use, carries enough gear for a long walk or casual hike, has room to carry non-photography items and isn’t too big and bulky. When I saw the USA Gear S17 (which I’ll just call the S17 from now on), I knew it had the potential to be a camera backpack that I’d use on a regular basis.
1) Specifications
Internal Dimensions: 11″ x 10.5″ x 6″ / Waist straps adjust up to 14 inches ; shoulder straps adjust up to 45 inches.
Weight: 2.5 lbs
Padded compartment (16.5″L x 10.5″W) for laptops/notebooks (can fit up to a 15.6″ Laptops), tablets, books and more.
Wear as a backpack with two straps or tuck one strap away to wear as a sling; utilize the waist strap for weight management and comfort.
Many versatile features including 8 accessory pockets, rain cover, tripod holder with strap and foot holder, luggage handle slot, additional dividers and more.
Three year warranty
2) First Impressions
When it first arrived and I unpacked it, it had a very strong smell (think new plastic), but it faded after a day or so. The first impression the S17 gives is a good one. It definitely has a lower profile than many camera bags I’ve seen. The material seemed to be durable, with good zipper grips and quality construction. The straps appeared to be well padded and the various compartments seemed to be spacious enough for most gear and accessories.
Front view of the bag.
3) Storage
Once I started using the S17 I was not disappointed. The main compartment easily holds a full frame DSLR with an attached medium sized lens (like a 24-70mm f/2.8), but probably won’t fit a body with a grip or a bigger zoom like a 70-200mm. It also gets a little tight if you like to leave your lens hoods on, as the dividers are just wide enough for a lens. Of course, it’s easy to work around by rearranging your lenses a bit or just taking off the hoods. On the inside of this compartment’s flap there are two soft sleeves with hook and loop fasteners that would be great for filter storage.
Main compartment with: Nikon SB-800 flash, Nikon D810 with attached Nikon 35mm f/1.4 G, Nikon 20mm f/1.8 GSoft Filter holders
There are more storage options on this bag. There are two small zippered exterior pockets that can be used for memory cards, spare batteries or other small items. There is also a large zippered compartment on the top of the bag that is open and can hold personal items like a book, small jacket, food or chargers/cables. There are also some mesh compartments inside of this compartment, two that are elastic (one holds the rain cover) and one that is zippered. This should help to keep small items easily accessible. If you want to carry a tripod there is a drawstring pocket on the side of the bag that is made to hold tripod legs, but can also be used for a water bottle. Finally, there is a zippered laptop compartment on the back of the bag. My 15″ Mac Book Pro easily fit inside, but the manufacturer doesn’t recommend it for laptops larger than 15.6″.
Top compartment for miscellaneous storage.
4) Other Features
The main compartment that holds your camera and lenses is also accessible via a zippered side compartment. From this opening, you are only able to access your camera, not the additional lenses/flashes that are stored inside and accessible from the main opening. This is great for quick access when you don’t want to worry about dropping anything else or even taking off the bag.
Small side storage compartment (top) and zippered opening to access camera body (bottom)
The straps are fairly comfortable. They do a good job at distributing the weight of the bag, but work even better when you use the chest and waist straps as well. One thing that I found annoying about the straps is their length. The shoulder straps are made to convert into a sling bag (more on that in a bit), but that means lots of extra strap material that is flapping around. The waist strap is also annoying. I never found myself using it around the city, so I either had to let it hang down below the bag or tuck it inside the luggage handle slot, where the buckle could dig into my back. It’s not a deal breaker, but ideally the chest and waist straps would unclip from the bag when not in use.
The handle on the top of the bag is very sturdy and should stand up to years of use. The bottom of the bag seems to be a water-resistant material, so setting it down on wet ground is a lot less scary for your gear. The luggage handle slot on the back of the bag works great. My only complaint is that the spacing of the straps isn’t as wide as most luggage handles, so the straps get pushed out at a weird angle and don’t sit flat. Not a big deal as far as the operation of the bag goes, but worth mentioning.
If you decide to carry a tripod, in addition to the drawstring leg pouch, there is also an adjustable clip-strap that holds the top of the tripod. This is a great design that lets you clip and tighten the strap around the tripod, making sure you get a secure fit. If you don’t have a tripod with you, the pouch will easily hold a water bottle.
Tripod feet in the pouch.Tripod securely strapped inThe pouch can also hold a water bottle.
Converting this bag from a backpack to a sling bag couldn’t be easier. Just unclip both of the straps, tuck one into the luggage handle slot and clip the other on the opposite side. It works very well as a sling bag, but is too heavy for my taste. Although it is convenient for quick camera access, it just digs into my shoulder too much, so I personally wouldn’t use it this way for very long.
5) Conclusion
This is a great bag at a great price. It’s probably a brand you’ve never heard of, but that’s exactly the point. I think this bag’s quality speaks for itself. Of course, you could be taking a chance buying from a company you’ve never heard of versus a big name brand, but you’re also saving a bunch of money in the process.
It really checks all of the boxes for what I was looking for in a camera backpack. Low profile, good storage options and easy to use. As an added bonus, it will also carry a laptop. When I want to get away for a short trip, I’ll surely be grabbing this bag with just a few lenses (which is typically all I ever use) instead of my full rolling bag of gear, most of which I won’t use. It’s not a replacement for my Think Tank rolling camera bag that carries all of my gear, but it’s really not meant to be.
6) Where To Buy
You can read more reviews, see product photos as well as purchase the USA Gear S17 Camera Backpack for $49.99 on Amazon.com.
Update: I just heard back from the rep and it looks like we can’t get an updated discount code. Sorry everyone!
While some people might consider cell phone photography inferior to using a “real” camera, there are many who strongly believe that, as Chase Jarvis says, the best camera is the one that you have with you. These days, that camera is typically going to be a phone. With that in mind, what if you could add the flexibility of interchangeable lenses to your phone’s camera? That’s exactly what Aukey’s cell phone lenses do. In this post I’ll be reviewing a Wide angle and a 2x Telephoto lens. Also, since it seemed appropriate for a phone accessory review, all photos are taken with a cell phone.
1) Specifications (Both Lenses)
Aluminum and glass construction
5 Elements in 4 groups
Weight: 5.1 oz
Flexible clip that fits most phones
Storage pouch and cleaning case
Lens cap
Works on almost any mobile device and tablet
2) First Impressions (Both Lenses)
When the Aukey lenses first arrived, I was quite impressed with the packaging. The boxes have a clean, sophisticated look to them that gives the impression of a quality product. The inside of the packaging lived up to the expectation set by the outside. The lens is nestled inside a foam cutout and is kept from rattling around inside the main box by a small box of accessories, which include a cleaning cloth, clip and storage bag.
Aukey Cell Phone Lens PackagingAukey Cell Phone Lens and Included Accessories
The lens itself has a quality feel to it. It feels substantial, due to the metal and glass construction. The clip that attaches the lens to the camera also feels very sturdy and appears to be well made.
Of course, attractive packaging and good first impressions don’t necessarily make a quality product. To really see if these lenses are worth it I needed to get out and test them in the real world.
3) Real World Use – Wide Angle
Cell phone camera lenses are typically quite wide, but from time to time there are situations where you want to get an even wider shot than would normally be possible. This is where having the wide angle lens with you can be useful. You can see in the example below how much wider it really is.
Normal Phone LensAukey Cell Phone Lens Wide
You might also notice some slight vignetting in the corners of some of the images. This isn’t due to the lens. It’s actually the rear of the lens itself. I found that if the lens wasn’t positioned perfectly over my camera’s lens, I got this vignetting. Depending on the placement of the lens, it ranged from very mild to severe.
The side of the lens that touches your phone has a rubber gasket that goes around the lens on the camera. This serves two purposes… it keeps the lens from slipping once it’s in place and it also prevents light from entering between the lens and phone. When you use it on top of a case, it seems to move the lens just far enough from the phone body to allow it to show up in the image. To make sure this doesn’t happen, you’ll want to remove the case from your phone before using the wide angle lens. If you don’t remove your case, the severity will vary from phone to phone since different models of phones have different focal lengths.
In most situations, I didn’t notice any issues with flair. The one exception was when I was shooting directly into the sun, in which case I got some flare, but that’s to be expected with any lens.
3) Real World Use – Telephoto
The telephoto offers a great improvement over a standard cell phone lens. I often find myself wanting to frame my subject more tightly. This lens allows me to do that (to a certain extent) while still maintaining my desired perspective. Take a look at these two photos.
Normal Phone LensAukey Cell Phone Lens Telephoto
In the past, I’ve tried to photograph this sign with just my phone which gave me the first image you see here. For the second image, I didn’t move, I used the telephoto lens. This allowed me to capture the sign at a better angle and still fill the frame with it.
4) Lens Attachment System
Using these lenses all comes down to how they attach to your phone. If it’s a complicated system that’s difficult to use, you’ll never use them. Fortunately, the Aukey system works great. Each lens comes with a clip that holds the lens. Simply slide it over your phone, position the lens over the camera’s lens and you’re ready to go. It’s fast, easy and secure.
Aukey Cell Phone Lens with ClipAukey Cell Phone Lens on PhoneAukey Cell Phone Lens on iPad
I was able to walk around with the lens on my phone and it didn’t slip out of position. I was also able to quickly remove the lens if I wanted to take a photo without it and then easily put it back on my phone again.
The system isn’t perfect, though. Since it is so easy to attach and remove, it also takes a little practice getting positioned correctly. There were times when I thought I had the lens in the right place only to find (once I looked at my phone’s screen), that it needed some adjusting. Though not a big detractor, don’t expect to quickly put this lens on your phone to capture a fleeting moment.
5) Image Quality
As I used these lenses, I started to get a sinking feeling that they weren’t as good as I had hoped they would be. The change in perspective was excellent, but the image quality looked to be somewhat lacking. I noticed that in the images taken with the telephoto lens there were some parts that were sharp and others that were very soft. I notified the company and they quickly sent me a replacement lens. The second lens did the same thing, only less than the first. It was definitely more pronounced on my iPhone 6 than my iPhone 5 (all of the sample images you see here were taken with the iPhone 5).
On the wide lens, I didn’t notice the soft spots like I did on the telephoto. Instead, the entire image is a little soft. If you only ever view your images on your phone screen it shouldn’t be a problem, but on any screen (or print) larger than that you’ll likely notice that the images are soft.
Out of curiosity, I tried the lenses on different phones and photographed subjects at various distances. The severity varied, but neither lens was perfect on any of the phones I used for testing.
To illustrate the lens’ lack of sharpness, I photographed some test charts. Keep in mind, I did not try to center my phone or take perfect images. I’m not trying to precisely measure them and compare them to each other. Instead, these images should simply serve as a quick reference for these particular lens’ sharpness.
Make sure you click on each image to view it, otherwise you won’t properly see the results.
I personally love phone photography. I find myself reaching for my phone more often than my Nikon D810 for personal photos. Not only is it easier to carry around when I’m exploring a city, but it’s also less conspicuous and simpler to use.
Having small lenses for my phone that I could toss in a jacket pocket or backpack seems like a great idea. The fact that they are easy to put on makes them seem even better. Unfortunately, the image quality that these particular lenses provide is not good enough for me to use them on a regular basis. If I was heading into a situation where I knew I would want an image that was wider or tighter than my normal phone lens could give me, I’d grab one of these lenses, but otherwise I’ll probably leave them at home.
Both the Wide angle and 2x Telephoto lenses are available on Amazon for $44.99 each (as of 1/14/16).
Every once in a while, I come across gadgets that sound promising, because they serve a specific purpose that I have needs for. When browsing the web last July, I came across a post on a popular site that praised a smart tracker called ANKR. The post started out by talking about stolen gear and how unfortunate the incidents were. Then it went on to introduce ANKR and how amazing of a find it was to be able to “geolocate” (those were the words used) items such as the camera bag in case it got stolen. It all sounded really good, because it seemed to address my particular fear of getting my gear stolen, especially when traveling overseas.
ANKR’s promotional video sounded very convincing as well. With a young lady quickly setting a unit up, it showed her walking away without a purse, then getting an alert on her phone. In another instance, it showed the same model hanging out in a park, then dropping her keys on grass and walking away. She gets alerted, looks at her phone, tracks the device on a map, then goes back to find it on the grass where she left it. After watching the video, it really sounds like the device is a godsend:
Why didn’t I hear about such a device, I thought to myself. I went online and started looking up information on the ANKR to see what it was. Since the device was too new, there was nothing available – only ANKR’s website, which promoted the same video as above and didn’t have any useful information aside from the pretty-looking animations and big slogans like “Kiss Losing Stuff Goodbye”. At first, I wondered if someone somehow managed to stuff a GPS tracker on a tiny device. Being able to geolocate an item based on GPS data would be super cool! But at this tiny size and a price of $25, I already knew that it would not be possible. A GPS device can find its coordinates using satellite trilateration and it is a one way communication. For any device to be able to communicate its coordinates, it requires some sort of data connection, such as 4G or LTE connection you can find on mobile phones and tablets. Even if someone could make a small device that could do both, it would surely not be priced at $25.
After a bit of research, I found out that ANKR works via Bluetooth and its tracker is only useful when a mobile phone has Bluetooth turned on. As soon as the device goes out of the Bluetooth range, the ANKR app issues an alert. This was already enough to tick me off, because I realized that the article I read on the site about the device is basically an utter lie and its promotional video is very misleading, because it hints on being able to find the lost item on a real map. If your stuff gets stolen, you might get an alert that it is not in close proximity anymore, but good luck trying to actually find it! Once it is outside the Bluetooth range, you are done, end of story.
Here is how the ANKR and many other similar trackers really work. ANKR is simply a Bluetooth chip with a battery. Aside from being able to communicate with your phone via Bluetooth, it is just a dumb device. The tracking of individual devices is all done by an app that sits on your phone. If you disable Bluetooth on your phone, or you cannot find your phone in the first place, ANKR is basically useless, as it is tied only to your phone. So in the case of theft, if your camera bag is gone outside the Bluetooth range, the most you are going to get is an alert on your phone. If a thief has got your camera bag and is already 30 something feet away from you, good luck trying to find your bag. And the map locator would only work if your phone had correct GPS coordinates at the time you lost your item. If GPS data is incorrect or unavailable for some reason, or you have no data connection, the map feature is also pretty useless. These things are obviously completely omitted from the above video or ANKR’s website. All you get is nice marketing bluff like “Say goodbye to losing your $#!*, once and for all. Grab an ANKR or three…and the next time you lose your mind, it won’t be over losing your stuff” and other convincing messages about how cool and easy ANKR is to use and how helpful it can be for peace of mind.
Still, after thinking about it for a little, I decided to go ahead and buy a few of these devices. At $25, ANKR still sounded like a great idea and I thought of particular situations where it could be useful. I thought about attaching one to my camera bag and one to my car keys. Even getting alerted when the items move from my proximity range would be still useful, I thought, because I would at least know that I left them somewhere or lost them. It is easier to find an item within 30-40 feet range, than after many hours and potentially many more miles.
I ordered four via ANKR’s website.
Packaging and Installation
Since I was one of the early adopters, it took a while for the package to ship. After about 20 days, I received a shipping confirmation and received the item about a week afterwards. I opened the medium-sized box that had four ANKRs in it and I had a moment of excitement when I saw the individual packages. Each one was neatly designed and packed, with a large text on the front stating “Kiss Losing Stuff Goodbye”:
I opened the first one, attached it to my key chain and began the setup process. I downloaded the ANKR app from the App store on my iPhone, then touched the + sign next to Stuff. Although I was a bit annoyed by the scrolling text during the setup process, finding the activated ANKR (which can be done by pressing the half-button on the back) was quick.
Once the ANKR was connected, the app asked me what I would like to keep track of. There were a bunch of readily available options such as “keys”, “laptop bag” and “wallet”, so I went ahead and selected “keys”. I saw some green bars right next to “keys”, which indicated that things were setup and good to go. Interestingly, with about half a meter of space between my phone and the ANKR, my device was showing 3 bars out of 4. I moved the ANKR right next to my phone, thinking it would improve the signal, only to find that the bar went down even further, all the way to 1. Whoops, not good! And I have not even started using the device yet.
ANKR App (iOS)
Oh well, I thought why not connect another ANKR to my phone and put one in a camera bag? I set another one up and from the list of options selected “backpack”. Right after the device was added, I realized that I did not like the name and thought about renaming it to “camera bag”. As I navigated through the app, I realized that there was no place to actually do it from! Wait a second, what? How can an app not have the capability to rename a device after it is added? I searched through ANKR’s knowledgebase, only to find this article, which states that the device basically needs to be deleted and re-added if one wants to change its name. It also said “We are planning to add that feature to the ANKR details screen in an upcoming release”. That was last July. It is February of 2016 now, so after 7 months, the app still does not have this capability…
In fact, I found the ANKR app to be too simple and not as useful overall. Aside from the list of devices, safe zones and four options (tracking On/Off, get more ANKRs, help and owner information), this app does not have anything else:
Initially, selecting a device from the list only provided a map with limited and useless options, but overtime, the app developers updated the screen to include battery information, signal strength, ability to ping the device and provide firmware updates:
So it was even more frustrating to use the device at first, because it was clearly shipped in a very raw, beta stage. I could not even find a way to delete a device that was already added – I had to search the knowledgebase for that (turned out that I had to swipe the device to reveal the “Delete” option). Why not add an option to delete a device from its options page? Also, if you open the ANKR app on the iPhone, it will never allow the phone to sleep. It is simple stuff like this that has been plain annoying.
Android Support
And if you are an Android user, you are completely left out. Back in July the ANKR website stated “At the moment, ANKR is iOS only. But fear not, Andriod users, your app is on the way. Launching Winter 2015” and that message is still there! It is mid-February of 2016 already, so perhaps it is time to update that message at least?
If you have a chance to visit the general forum, you will see a long trail of messages demanding Android support. Apparently, people bought these things without realizing that there was no support for Android. Another whoops.
Connection Problems
My frustrations with the app were just the start – the hell really started to break loose after I started actually using the device. I had three of them active – two on key chains and one in my camera bag. When driving, my phone would constantly issue connection alerts and that’s with my phone literally being within a foot of distance from the car keys:
This happened a lot to my wife as well – she got so sick and tired of false alerts, that she ended up deleting the app from her phone. I was not willing to give up on ANKR quite yet, so I kept mine active until the batteries started to die…
Battery Life
ANKR’s marketing material, along with this knowledgebase article state that the battery should be good for 6 months. That turned out to be false advertisement as well – my car key ANKR batteries died in less than three months, while the battery in my camera gear died in less than two months. All I did was take my camera bag out in the cold. In fact, it was not that cold either – just around 40 degrees Fahrenheit. Perhaps it has nothing to do with the cold, perhaps I did not have my camera bag in proximity as much as I had the car keys, but still, that’s not even close to ANKR’s 6 month estimate.
Beeper / Ping Feature
Initially, I was pretty annoyed by the inaccurate signal strength bars – that was the only way to try to locate an ANKR device. As I have already stated above, the signal bars were so bad, that you could be right next to the ANKR and it would show a weak signal. Thankfully, ANKR introduced a “ping” feature on the latter versions of the app that allowed one to get the device to beep. I don’t understand how ANKR even started selling these devices without this feature, but oh well, such is the cost of the early adopter I guess.
Still, I found the ping / beep feature to be only slightly useful. Unfortunately, the beep sound is too low. If ANKR sits in the open and it is pretty quiet, you can probably use this feature to find whatever you lost. However, if there is any noise, or the ANKR is sitting under an object, the beep sound is too low and won’t be of any help. Another annoyance is the fact that you have to keep on tapping on “ring” to keep ANKR beeping. The darn thing will only beep twice and will stop, until you tap “ring” again.
Summary
I am not sure if other Bluetooth trackers are as bad, but ANKR definitely left a bad taste in my month to the level where I will probably never consider another tracker like this. Terrible iOS app, lack of Android support, poor connection resulting in constant false alerts, poor battery life – I wonder what else could go wrong with this useless “gadget”. I wish I could return all the trackers I have and get my money back, but it ain’t happening. Last time I emailed ANKR support, I was told that I could get my money back only if there was a defect with the product. I did not bother dealing with ANKR any further after that. Funny how all the glowing reviews on Amazon are from people who received their sample for free, in exchange for a review. Shows how useless user reviews on such sites have gotten lately…
Don’t waste your money on ANKR. It is a piece of junk, nothing more.
Many photographers who want to upgrade their tripod are stuck choosing between high-end aluminum tripods and low-end carbon fiber models. These two types of tripod tend to be similar in price, which makes the decision even more difficult. I have been trying out the carbon fiber Oben CC-2461 tripod over the past few months, along with the accompanying BE-126T ballhead. This review covers my experiences and recommendations for photographers trying to decide on a tripod at this price point.
The CC-2461 tripod costs $320, while the BE-126T is $130. They can be bought as a set for $427.50.
1) Specifications
BE-126T Head:
Stated Load Capacity: 26.4 lb (12.0 kg)
Ball Sphere Diameter: 38 mm
Height: 3.9” (9.9 cm)
Weight: 15.2 oz (430.0 g)
CC-2461 Tripod:
Number of leg sections: 4 (three flip locks on each leg)
Stated Load Capacity: 17.6 lb (8 kg)
Maximum Height: 62.2 inches (158 cm)
Maximum Height without Column Extended: 52.2 inches (132.6 cm)
Minimum Height: 6.0 inches (15.2 cm)
Folded Length: 21 inches (53.3 cm)
Weight: 3.0 lb (1.36 kg)
2) The Head
The BE-126T ballhead that comes with this combo is very impressive. It operates via two twist knobs – one that loosens/tightens the ball, and one that causes the head to spin 360 degrees horizontally for panoramas. This is typical for most heads around the $130 price point; there is no third knob to control the ballhead’s tension.
The 360 rotation is very smooth, and the knob – though small – is easy to turn. The main knob is not quite as well-made, however, requiring some force to lock and unlock. This is not ideal, especially since the knob itself is made of grooved aluminum. If you aren’t wearing gloves, it can be a bit rough to use. However, the ballhead’s movement is very smooth, and – when locked – stays in place extremely well. At a price of $130, in fact, I have yet to find another ballhead that stays in place so well. I tried pushing down on my 70-200mm f/4 at full zoom, and it didn’t budge.
I also like that the ballhead has a bubble level embedded on the top, which is unusual for any head – especially at this price. Although the bubble level is only a small feature, it is nice for creating multi-shot panoramas on uneven ground.
Lastly, the head is Arca-Swiss compatible. We already discussed the Arca-Swiss system in detail, but the main point is that this ballhead works with the industry’s standard camera plate. The BE-126T, for example, is compatible with the L-bracket that I use on my camera – even though the L-bracket is made to work on a different manufacturer’s ballhead. This means that I can swap my camera from one ballhead to the next without changing the L-bracket.
3) The Tripod
As much as I like the BE-126T head, though, the CC-2461 tripod is not very inspiring. There are a few issues, but the most significant is that it doesn’t fully lock down! Even when every knob is fully tightened, the center column spins ever so slightly from left to right. If you are photographing indoors, it should be fine; the column doesn’t spin unless you apply a moderate amount of force. However, under heavy wind, your setup simply won’t be as effective as possible.
It is worth mentioning that I only tried one copy of this tripod. Others may lock perfectly into place; I am only describing my personal experiences. Even if the tripod does lock completely, though, there are other issues.
For one, the locks on the legs (which are flip-locks rather than twist-locks) will pinch your thumb unless you open them carefully. I have used tripods with flip-locks in the past, and this is the only one that has such a problem. It’s not necessarily a deal breaker, but it definitely is an annoyance.
Also, although the tripod is fairly steady, it is not at the same level as a high-end tripod from Gitzo or Really Right Stuff. This isn’t surprising if you have owned a top-of-the-line tripod, but it shows that not all carbon fiber models are equally stable. Using a 200mm lens at the BE-126T’s full height, it was easy to see vibrations in live-view mode. If I tapped the side of the tripod, it took about ten seconds to dissipate all vibrations at full magnification; my RRS tripod – which, granted, weighs about a pound (a half-kilogram) more – stopped the shaking in about two seconds.
On the positive side, the feet on the CC-2461 are very well-made. It is very easy to switch from spiked feet to standard rubber feet; just twist them a few times. The rest of the tripod is also well-made, and it stands up well to the elements. I would be wary of using it in salt water, but lakes or streams will be no problem.
4) Recommendations
A low-end carbon fiber tripod like the Oben CC-2461 simply is not on the same playing field as a high-end Gitzo or RRS model. That’s fine; it isn’t meant to compete with those tripods. However, if you do purchase a carbon fiber tripod like the CC-2461, you likely will find yourself wanting something better in the long run. My recommendation is to stick with aluminum tripods until you make the plunge directly to a Gitzo or RRS tripod.
On the flip side, if you’re looking for a good tripod head at this price, it is hard to find one sturdier than the BE-126T. High-end heads from RRS are still better, but they are several times more expensive; the BE-126T is more than enough for people with aluminum tripods in the $200-$300 range.
Tripods can be a tricky purchase. For a first-time buyer, it seems like anything above $100 would be a waste of money; surely the CC-2461 is more than enough. However, there is a reason why this tripod costs $400, and there is a reason why a RRS tripod costs $800. If you use a telephoto lens (especially 100mm and longer) or shoot in wind and moving water, this tripod doesn’t cut it – and the same would be true even if the center column locked perfectly.
Although I don’t recommend the Oben CC-2461 tripod, the BE-126T head is a good purchase. Its main knob isn’t perfect, but enough force locks this head more sturdily than I would have expected. Even pushing down with a long lens doesn’t cause the head to creep; that is unusual at this price.
During our trip to Turkey, Lola and I had a chance to briefly meet with my Turkish friends from MIOPS.com, the talent behind MIOPS Smart Trigger and Nero Trigger (see our detailed review of Nero Trigger). MIOPS is a small business that operates out of Turkey, with an exceptionally knowledgeable team of software and hardware engineers. I first met the MIOPS team at the Photo Plus Expo in New York back in 2013 and since then we have become good friends. So when they found out that Lola and I were flying out to Istanbul, they invited both of us to their corporate office for a tour of their production facilities. Since I had a couple of cameras with me during the trip, I requested to record an interview with the team in order to introduce both the product and the talented team behind the product to our readers. In this article, I would like to share the recorded interview with our readers and provide some information on the MIOPS Smart Trigger. If you have never heard of this little device, I would definitely encourage you to read on, since this little gadget might get your creative juices flowing with all kinds of new photography ideas.
Let’s take a look at the MIOPS Smart Trigger in more detail.
What is MIOPS Smart Trigger?
In a nutshell, MIOPS Smart Trigger is a multi-function accessory that can be used to trigger both your camera and a flash unit when a specific event such as a lightning takes place. It has several sensors and inputs to feed data into the device, so it is capable of monitoring light, sound and even laser events. Thanks to its ability to adjust different sensitivity levels, along with the ability to delay action, one can use the tool for all kinds of creative photography – from capturing lightnings to doing high-speed photography. If you have seen those epic photos with bullets piercing through objects, or water droplets making exquisite shapes upon impact, those were probably captured with a similar device, since everything has to be timed perfectly – something the MIOPS Smart Trigger is capable of doing. Those who have previously experimented with high-speed photography involving object collisions know how hard it can be to time things right, especially when doing everything manually by hand. So when the MIOPS engineering team embarked on the project to create the ultimate camera and flash trigger, they knew that they had to create a solid all-in-one solution, built on real user feedback. After integrating multiple sensors, a bluetooth chip for remote control, an intervalometer and a few other user-upgradeable software capabilities, the MIOPS Smart Trigger was born.
The MIOPS Smart Trigger is the current and the most recent version of the device. Before that you might have heard of the Nero Trigger, which had some of the functionality of the MIOPS, but lacked the ability to be controlled remotely, or be setup for different scenarios. Tom Redd from our team reviewed the Nero Trigger and loved the results he was getting for capturing stunning lightning shots, right from his backyard:
However, with rather nasty and rainy weather that typically accompanies epic storms, the inability to just leave the camera in a spot and control the capture process remotely was one of the major pitfalls of the Nero Trigger. MIOPS fully addressed that problem, so now you can avoid getting soaked and sit in the comfort of your home or your car, while the trigger will do the job. All you have to have is install an app on an Android or an iOS device and after the device is synced up via bluetooth (which literally takes a few seconds), you will be able to run through all the commands remotely.
The device can sit on the hotshoe socket of your camera and in order to trigger your camera, it needs to be connected through a cable, which is compatible with the accessory input of your camera.
This means that your camera must have this accessory port, or the device won’t be able to communicate with your camera. To see a list of compatible cameras, please visit this page. Fortunately, most cameras out there, including many entry-level cameras from Nikon, Canon, Sony, Pentax, Fuji, Olympus, Panasonic and other manufacturers are fully compatible – you just need to get the right cable for the unit.
Once the unit is connected, you are ready to go! If you want to connect to an external speedlight for high-speed photography, you can use a male mini to PC Sync cable and connect it through the side socket of the MIOPS unit. The MIOPS is capable of triggering both your camera and an external flash unit at the same time!
If you shoot landscapes and want to capture lightnings, the MIOPS Smart Trigger has a light sensor on the front of the unit, as shown below:
All you have to do is set the sensitivity level and point the device towards the lightning. The moment the light levels change, the MIOPS will trigger your camera – it is as simple as that. Here is a double lightning shot I was able to capture last year with the MIOPS, connected to my Nikon D810:
Double Lightning by Nasim Mansurov NIKON D810 + 70-200mm f/2.8 @ 95mm, ISO 100, 30/1, f/5.6
If I did not have the MIOPS with me, I would have to stand there with my camera while it was raining. I captured the above shot while sitting in my car, which was very nice! Thanks to a long exposure, I was able to capture multiple lightning events in the scene – one that was happening at lower altitudes and one that took place higher in the clouds. The nice thing is, once the camera is connected, you can use a mode like “Press & Hold”, which once you set your camera to Bulb mode, will allow you to control the shutter speed of your camera manually.
If you are in love with timelapses, you can use the MIOPS Smart Trigger for shooting timelapse sequences as well. You can set your Interval, Exposure and Limit parameters and let the device take over from there. Again, you have the capability to control the sequence remotely, which is very nice, since you do not have to constantly stand with your camera. Here is a timelapse I was able to capture with the MIOPS Smart Trigger earlier this year:
I am not a timelapse expert by any means, so the video probably looks rather boring (in fact, this was my first attempt at shooting a timelapse). Next time I am out in the field, I am hoping to bring along a slider to capture some movement. This is one area that I have not explored much yet.
Interview with Emir Bayraktar
And below is the promised interview with Emir Bayraktar, one of the managing partners of MIOPS. It was a pretty rushed interview before our dinner and I did not have another camera to capture myself while I was asking questions, so I apologize for that. In all honesty, I was pretty jet-lagged from a 13+ hour flight and did not feel like appearing in front of the camera anyway :)
I shot the interview with a set of Sony A6300 cameras, using Sony 35mm and 50mm prime lenses. The camera is amazing at capturing video (it can shoot 4K video and up to 120 fps in 1080p) and there is finally a microphone input, but Sony strangely omitted the headphone input, which makes me wonder what they were thinking. The lenses for the A6300 were rather disappointing to shoot with, but we will leave that to the upcoming review of the A6300, which I will hopefully be working on soon.
We will be posting a full review of the MIOPS Smart Trigger in the next couple of days, so stay tuned!
MIOPS Smart Camera Trigger is a camera and flash trigger in a single unit. It provides seven different triggering modes, including lightning, sound, and laser. It also functions as an intervalometer for timelapse photography. It has an HDR mode, a scenario mode, and a DIY mode. With the smartphone app, you can also use the trigger in four shutter release modes: cable release, press and hold, press and lock, and timed release. The past few days I have had a lot of fun playing with my MIOPS Trigger, and I would like to share my experiences with you.
Note: Nasim recently posted an introduction to MIOPS Smart Trigger, which I recommend reading to understand how the device works and what it can be used for.
1) First Impressions
I received my MIOPS Smart camera trigger just before we left for a weekend trip to Destin, Florida. The weather forecast called for some storms, so I threw the MIOPS into my bag. Living on the Gulf of Mexico, we get a lot of electrical storms, and this was the main reason I wanted to try the trigger. I had successfully captured lightning before, but it was a hit and miss type of capture. I was very interested to see if this device would increase my strike capture rate.
Our first night I woke up around 5:30 in the morning to the sound of thunder. Now I’m not a morning person, but I dragged myself out of bed and found my camera. I hadn’t even opened the MIOPS box yet, let alone read the instructions. Oh well, I have an engineering degree, so how hard can this be?
As I opened the box and found the battery I realized that I should have done a bit more preparation. The battery would take longer to charge than the storm would last. I also discovered that the MIOPS does not ship with any instructions, which would mean downloading them first! No time for that. I was beginning to regret dragging myself out of bed. I decided to install the battery and take my chances.
It turns out that the MIOPS comes shipped with the battery approximately 80% charged! I was thrilled. I wish more manufactures would do this. I grabbed the camera to MIOPS connection cable and hooked it up to my Nikon D800. So far, so good! When I turned the unit on, I discovered a very easy to use menu interface. Bonus marks for the developers. Remember I’m not a morning person, and I hadn’t even had a cup of coffee yet, so simplicity was paramount. I went to grab my tripod to set up on the balcony. That’s when I realized that in the haste to unpack the night before, I had left my tripod in the car. Oh well, time to improvise. I stacked our cooler on top of a coffee table and balanced the camera and MIOPS unit on the top. I framed up the shot as best I could. I set my camera to a low ISO (100) and a fairly small aperture (f/11) in aperture priority. I switched to manual focus, focusing on the horizon and crossed my fingers. Within ten seconds I saw a large bolt of lightning light up the sky and heard the sound of my camera’s shutter. Success!
I was quite proud of myself and very impressed with the MIOPS trigger. However, I guess in my excitement to chimp at the back of the camera, I loosened the cord connection to the trigger unit. This time a beautiful forked bolt of lightning lit up the sky, but I didn’t hear my camera fire. Several more bolts, still nothing. I adjusted the sensitivity on the MIOPS. Still nothing. By the time I realized that the connection had become loose, the storm had subsided. Regardless, I was impressed at how well the MIOPS trigger had worked. Although I was kicking myself for not realizing sooner why it hadn’t fired at subsequent bolts. I blamed that on the lack of caffeine, not the trigger!
The MIOPS unit is slightly smaller than a deck of cards and appears sturdy and ruggedly built. It doesn’t take up much room in your camera bag or pocket. It has a hotshoe adapter so that you can attach it directly to the top of your camera and a ¼”-20 brass threaded insert so that you can mount it away from your camera on a lightstand or tripod. It comes with a rechargeable Li-On battery, which is rechargeable through a USB connection. I was very impressed with the battery life, and only had to recharge it once throughout my testing.
The MIOPS ships with the trigger, a camera connection cable, a flash connection cable, battery and USB charger.MIOPS trigger mounted on camera.
As I mentioned earlier, the Menu system in the MIOPS is very easy to negotiate. It has two main buttons (menu and start) surrounded by four navigation keys. Scrolling through the modes and changing parameters is very straightforward. The screen is clear and easy to read, even in bright daylight. The buttons are firm and responsive.
In addition to using the unit directly, you can download MIOPS’s smartphone app. It is available in both iOS and Android platforms and can be used as an alternate interface to configure and control the device. The app is very well designed and simple to use with a great user interface. Like the menus on the trigger, using the app was self-explanatory.
Because the trigger itself is often out of reach when you set up your shots, I found the app more convenient to use. It made changing parameters and starting/stopping the unit much easier.
I was also impressed with the Bluetooth connection between the app and trigger. It took only a second or two for my phone to detect the trigger. I never had any troubles with the Bluetooth disconnecting. For several of my shots, I was standing approximately 40’ away from my camera with the MIOPS mounted in its hotshoe and had no problems communicating with the trigger. In addition, each unit has its own identifier so that if you are shooting with a friend you will not interfere with each other’s connection.
The smartphone app interface.
3) Modes
The MIOPS has seven different modes that can be selected from the trigger. In addition, there are four camera release modes that are available using the smartphone app.
3.1) Lightning Mode
As I mentioned earlier, the main reason I was interested in the MIOPS was to use it as a lightning trigger. I was not disappointed. I think what I liked best about the unit was how fast and easy it was to set up.
Lightning Mode has one parameter you can vary, sensitivity. For taking shots of lightning during the day, when the bolts are not as bright, you can increase the sensitivity. If the storm is very strong, the skies are dark, and you only want to catch the more intense strikes, you can adjust the sensitivity downwards.
Another benefit of using the MIOPS to capture lightning is the safety aspect. I could set up my camera and sit inside, or in my car, where I was out of the elements and out of “striking” distance! Remember that the current from lightning can travel long distances. It is not safe for you to be outside when you hear thunder, even if it has not started to rain yet where you are.
Although I have not had a chance to capture a lot of lightnings with the MIOPS yet, I am sure I will be using it quite a bit during the storm seasons. Here is an image of a lightning captured by Nasim while he was sitting in the comfort of his car, triggering the camera remotely as it was raining:
Double Lightning by Nasim Mansurov NIKON D810 + 70-200mm f/2.8 @ 95mm, ISO 100, 30/1, f/5.6
3.2) Sound Mode
To test the Sound Mode I had fun with some water balloons. I found that the hardest step using the trigger was planning and setting up the shot. Execution was the easy part. In my first test, I connected the MIOPS trigger to my flash to capture some high-speed stop-action shots. In order to freeze the action of the balloon bursting, you need a much faster shutter speed than your camera is capable of. To get around this, I set up my camera in our bathroom (the only room in the house without windows) so that I could turn off the lights and use only my flash to expose the shot. By setting my flash to 1/64th power, I achieved a flash duration of 1/35,700th of a second.
Setup for balloon burst using high-speed flash to freeze the action.
MIOPS did not disappoint! Here are the first three shots I took. The sound of the balloons popping was enough to trigger the flash.
NIKON D800 + 24-70mm f/2.8 @ 70mm, ISO 400, 5/1, f/9.0, Flash set to 1/64 powerNIKON D800 + 24-70mm f/2.8 @ 70mm, ISO 400, 5/1, f/9.0, Flash set to 1/64 powerNIKON D800 + 24-70mm f/2.8 @ 70mm, ISO 400, 5/1, f/9.0, Flash set to 1/64 power
Popping water balloons is a lot more fun when you have a target! So, with a bit of a bribe I managed to convince my daughter to sacrifice herself in the name of this review! This time I connected the MIOPS to my camera directly, and used a fast shutter speed to capture the action. Since Lisa did not want to go through this experiment more than once, I did a test run using a bike helmet as a stand-in for her head!
Setup for balloon bursting on Lisa’s head.Test shot! NIKON D800 + 24-70mm f/2.8 @ 70mm, ISO 800, 1/3200, f/2.8
I did have some difficulty using the trigger in the outdoor shots above. Firstly, in order to have the trigger pick up the sound of the balloon over the background noise, I had to have the trigger quite close to the popping balloon. This is an issue because the connection cable is very short and I did not want to set up my camera any closer to the splashing. I found that if I tried to stretch out the coiled cord, it would loosen just enough to disconnect from the MIOPS unit without actually falling out. This resulted in several popped balloons without any photographic evidence of the event (translation, Lisa had to endure over a dozen failed attempts). In the end I had to elicit the help of my husband. He stretched out the cord, pulling the MIOPS trigger towards the balloon, while holding it tight into the device with the other hand. I popped the balloon and Lisa braced for impact. This combination of extra hands produced a 100% success rate.
3.3) Laser Mode
MIOPS can also detect a laser beam (from a laser pen purchased separately) and trigger your flash or camera when the beam is broken. As with the Sound Mode, the hardest part of capturing motion shots using the Laser Mode was the planning and setup. I also felt limited by the length of the both the flash and camera connection cables again. It would be nice to be able to place the MIOPS farther away from the flash or camera for more flexibility positioning and aiming the laser beam. However, once I was set up, capturing the action was easy and 100% repeatable. If you want to try and capture water drops, this is the mode to play with.
Laser Mode has several parameters that you can change. The threshold level can be changed to allow for different brightness of beams. You can also adjust the delay of the trigger from 0-999 milliseconds (almost 1 second). Thirdly, you can change the number of frames taken once the beam is broken.
Setup for Laser Mode shot.NIKON D800 + 24-70mm f/2.8 @ 70mm, ISO 400, 5/1, f/11.0, Flash set to 1/64 powerNIKON D800 + 105mm f/2.8 @ 105mm, ISO 400, 8/10, f/16.0, Flash set to 1/128 power
3.4) Timelapse Mode
The Timelapse Mode allows you to take a set number of exposures evenly spaced apart. I have an intervalometer built into my camera, but I find it finicky to set up. The MIOPS Timelapse Mode on the other hand is extremely easy to configure. And, an added benefit is that if your camera is in bulb mode, you can set the length of your exposure from the trigger. This allows you to set exposures longer than 30 seconds.
I experimented with this mode to create a series of photos of an incoming storm and then created the short timelapse video below.
Nasim has also used his copy of MIOPS to make a timelapse in 4K resolution, which you can enjoy below:
3.5) HDR Mode
Although I did not test the HDR Mode, it can be used to create extreme HDR’s with images that have exposures longer than 30 seconds.
3.6) DIY Mode
The DIY Mode opens up all kinds of possibilities. In this mode, you can connect external sensors to your MIOPS, such as temperature, pressure, motion, etc. Although I did not test this mode, it offers a great deal of versatility for capturing event-based action. This mode sets MIOPS Smart apart from other camera remotes.
3.7) Scenario Mode
Using the Scenario Mode you can create a custom script with up to five different steps. In each step, MIOPS can use any of the six basic modes (Lightning, Sound, Time Lapse, Laser, HDR, or DIY) or a certain amount of delay. Each step is fully configurable using the parameters of that particular mode.
For example, if you were going to photograph a fireworks display, you could create a scenario where you set up MIOPS to capture a timelapse sequence of the crowd arriving and sun setting. Then photograph each firework explosion as individual images using the Lightning Mode. All of this could happen while you enjoy the show!
The possibilities are only limited by your creativity!
3.8) Shutter Release Modes
If sound, laser and lightning aren’t enough, you can also release the shutter four different ways using the smartphone app (cable release, press and hold, press and lock, and timed release). These modes are self-explanatory and mean that if you have the MIOPS in your bag, you don’t need to carry around a cable release or dedicated wireless release.
Using Timed Release Mode allows you to set a delay anywhere between one second and one hour. This gives much greater flexibility for organizing large group shots than any camera allows. However, do not use this mode for selfies! For an explanation, see Nasim’s excellent article “The Generation of the Self-Obsessed“!
I had some fun with the Press & Hold mode, which allows you to continuously fire your shutter while touching the screen. I set up my camera on a tripod in front of a couple of our birdhouses. Then I relaxed on the patio, in the shade, with that cup of coffee I didn’t have the first time I used the trigger, and watched for incoming birds. I was able to capture several shots of the bluebirds and titmice coming in to feed their babies without having to set up a hide or disturb the birds. It allowed me to see the whole scene, not just the scene through the viewfinder. I was able to see when the birds were approaching and could hold down the release just as the birds flew up to the house. With my camera set to a high frame rate, I was able to capture various wing positions each time.
The MIOPS Smart Trigger did have a few problems. For some reason, the screen on my first unit stopped working after just a few days. I could still use the trigger through the smartphone app though. The company replaced this unit within a few days (excellent customer service, by the way!) and I haven’t had any screen issues with the second unit. I am assuming that something must have happened to the screen during shipping.
I was also disappointed with the cable connections to the MIOPS unit. The connections seem to stay in place at the camera and flash end, but not to the MIOPS trigger. This did lead to several missed opportunities. However, once I was aware of this problem, I could work around it. The length of the cables was also limiting, and I wish the unit would ship with 3’ cables that were not coiled. After some research I did discover that you can extend the camera cable using a 2.5mm stereo extension cable and extend the flash cable using a 3.5mm mono extension cable.
The only other thing that would improve the unit, and this is getting picky, is a better hotshoe adapter. The adapter is plastic and was a very tight fit in each of my cameras. I really had to work to get it to fit in my hotshoe and felt that I might damage the hotshoe in the process. I also worried about the adaptor breaking off from the unit when I fought to remove the MIOPS trigger from my camera.
It turns out that the hotshoe adapter works great on Canon DSLRs, but is a bit too tight for Nikon DSLRs. We have provided feedback to MIOPS regarding this and we are hoping that the developers will come up with a solution soon.
5) Final Verdict
In my opinion the pros far outweigh the cons and the MIOPS Smart Trigger is a winner. As well as providing many ways to trigger your shutter, it is small, has a long battery life, has a very easy interface, has a well designed smartphone app, is very reliable (apart from the cord issues), its firmware is upgradable, and it is solidly built. At $199, the MIOPS Smart Trigger is a great value. In addition, I found the resources on the MIOPS website very helpful. If you are in the market for a wireless trigger, and want to have some serious fun with high-speed, stop-action photography and lightning photography, give this gadget a try.
6) Where to Buy
MIOPS Smart Camera Trigger can be bought from MIOPS.com directly. No matter what part of the world you are from, MIOPS will send you the trigger via DHL Express, so you should receive the unit within 1-3 business days. Shipping is free.
I have been looking for a small portable alternative to carting my tripod around with me for quite some time now. There have been many occasions when I’ve been out photographing and could have used the support that a tripod provides, but could not be bothered to lug my tripod with me. I have tried using a variety of small tabletop tripods. None of them were strong enough to support a DSLR and heavy lens. Beanbags are cumbersome to carry around as well. This past summer I stumbled upon a Kickstarter campaign for Platypod Pro Max, and I was intrigued. Could this possibly be the answer to my search?
So What is a Platypod?
Platypod Pro Max ($99.00 from B&H or Adorama) and its little brother Platypod Pro ($49.95 from B&H and Adorama) are a great way to provide stability to your camera. But most importantly, they are extremely compact and easy to throw in a camera bag. Unlike typical tripods, the Platypods consist of a small metal base that you attach a ball head to, instead of legs. They are made from lightweight aircraft quality aluminum.
Platypod Pro Max with a Nikon D500 attached and Platypod Pro with a Fuji X100TMax and his little brother, Pro
So before I go any further, I want to let you know that I purchased both Platypod Pro Max (Max from now on) and Platypod Pro (Pro) with my own money during their Kickstarter campaign. Platypod did not provide me with any kind of compensation for this review. So with my disclaimer out of the way, let’s take a closer look at Platypod Pro and Max.
The Pro is the smaller model and works well with mirrorless cameras and DSLRs with small to medium sized lenses. It measures 3×5”, is 4mm thick, and weighs just 3 ounces. Platypod Pro can be used with ball heads smaller than 4”. I used a Sirui G-10KX and I could easily access all the knobs on the head. However, if you have a ball head with knobs or screws close to its base, you may find that they interfere with the ¼”-20 bolt near the front of the plate. This bolt can be used to attach speed lights or other accessories to the Pro.
Platypod Pro with Sirui G-10KX ball headPlatypod ProPlatypod Pro
The Pro model can be purchased as a kit, which gives you a few extras. Firstly you get a nylon case. The case is compact and fits the plate by itself. However, with a couple of origami-like moves, it transforms into a box that will hold a small ball head as well. In addition, the kit comes with three screws that have a sharp tip on one end and rubberized feet on the other. They can be threaded into the plate to help stabilize and level it. The kit also comes with a 1/4” to 3/8” female spigot adapter.
Platypod Pro Deluxe Kit
Max is the newest model and is substantially larger than the Pro. As such, it is capable of supporting large DSLRs with much heavier lenses. Max measures 5.25×7.75” and is 5mm thick. Weighing in at 13oz, it is substantially heavier than its baby brother, but still easily portable. I have a Sirui K-40X ball head, which is a large ball head, and it felt very balanced on Max.
Platypod Max with a Sirui K-40X ball headPlatypod Max with a Nikon D500+80-400 f/4.5-5.6 lens attached
Max ships with four two-inch long ¼”-20 spikes. Like the Pro’s spikes, these also have a rubber tip at one end and sharp points at the other. The spikes come in a neat little storage box that clips onto the top of the plate. A great feature to help prevent losing them. The spikes work well to ensure that the rig doesn’t slip. The rubber ends won’t mar delicate surfaces, like the hood of your car. Since they are adjustable, they also allow you to level Max on uneven surfaces. Max also has a pair of slots. The slots allow you to strap Max to a vertical pole or post using a belt.
Max with a Nikon D500+70-200 f/2.8 lensMax with a Nikon D500+70-200 f/2.8 lens
So What Did I Think?
I particularly like how convenient it is to throw a Platypod into my camera bag. They hardly take up any room. When I’m shooting with my Fuji X100T or Nikon D500+kit lens (16-80 f/2.8-4 lens), I have the Pro in my bag. And if I’m using heavier lenses, I throw Max in instead.
The Platypods really shine when you need to shoot longer exposures from a low angle. In places where space is limited and it is hard to splay out the legs of a full sized tripod, the Platypods come to the rescue. With a ball head mounted to either one, it is very easy to adjust the camera angle, as opposed to simply setting your camera on the ground.
For this low angle image taken with my Fuji X100T and Platypod Pro, it would have been very hard to use a tripod without having its legs stepped on!
At night or for selfies, I can usually find an elevated surface to place my Platypod on. However, Platypods do not have anywhere near the flexibility that a tripod does. I sometimes find it frustrating when the object I want to prop the Platypod on isn’t in the right location. A tripod is easy to move a few feet to the left or right. However, moving a large boulder or mailbox is a little harder!
To get this shot I placed my Platypod Pro on an electrical box near the intersection. It allowed me to get a 1s exposure without taking up a large footprint on the sidewalk, as would be the case had I used a full sized tripod.
When you can’t find a horizontal surface to place your Platypod on, it is handy to be able to strap it to a something vertical. However, this can be a bit fiddly to do. It takes a bit of time to get the rig safely attached and adjusted properly. I found it much easier to configure the Pro model vertically than it did to strap Max to a post. With heavy gear, you want to make sure Max is not going to slip. Because I don’t usually wear a belt, I did not find it convenient to set Max vertically. On the other hand, it is easy to keep a handful of lightweight cable ties in my bag. The ties are a great way to attach the Pro model to vertical objects.
Pro with a Nikon D500+16-80 f/2.8-4 lens. Cable ties threaded through the holes work well to attach the rig to a tree.
Another benefit to using Platypods is that they can be taken to locations where tripods would be difficult to bring, or are not allowed at all. With your camera and ball head attached to a Platypod, it is easy to balance the rig on a railing, aim the camera in any direction and take the shot.
Conclusion
Platypods are lightweight and compact. They are rugged, very well made and will last a lifetime. They fit easily into a camera bag. As a piece of camera gear, they are relatively inexpensive. When was the last time you purchased a piece of kit for under $100?
They will not replace your tripod, but in a pinch, they are a great substitute.
Platypod Pro and Max are the best alternatives I have found to carrying a traditional tripod with me. They have allowed me to get shots that I would not have been able to capture without a tripod. They are an indispensable piece of kit and have earned a permanent home in my camera bag.
For most photographers, especially those who shoot landscapes, it is crucial to have a good set of filters at your disposal. Filters come in two types: screw-on filters (attaching directly to your filter threads) and square filter systems (sliding into a holder on the end of your lens). A lot of landscape photographers move to a square filter system over time — they have a wider selection of filters, and they let you move your filters from lens to lens more quickly. The main companies that make square filter systems are Lee, Cokin and HiTech, all of which are well-known among landscape photographers. There are a few other companies in the marketplace, too, including a relatively new brand called NiSi. Recently, NiSi has been contacting photography websites for reviews, and they contacted us as well. I have used the Lee system for a while, and experienced a few problems with it, so I wanted to review these NiSi filters and see how they stack up. This review covers the NiSi filter system, along with a few specific filters.
1) About This Review
For this review, NiSi sent us two sets of filters. I took one, and Spencer took the other. We each reviewed the filter set separately and combined our thoughts (which were fairly similar) into this review. We have been allowed to keep these filters. That is always a problem with online reviews — smaller companies sometimes send out freebies to websites, and you have to take bloggers at their word that the review is honest and legitimate. That is especially true in a review like ours, which is mostly positive.
Our opinions here are entirely our own, and we only accepted the filters under the condition that we can write whatever we want about them. These NiSi filters are good, but they aren’t perfect, as this review makes clear. Here, we’re reviewing the entire NiSi system. This includes the filter holder and adapter rings, as well as the filters themselves (a polarizer, an ND grad, and a ten-stop ND filter). We go through all the pros and cons below.
2) Build Quality
The first thing you’ll notice about NiSi filter system is its build quality. As a whole, it feels fairly well-built and solid. In particular, the graduated ND filter is made of glass, and it feels very high in quality. Standard Lee’s and HiTech’s versions are made of resin, which scratches much more easily, although you can get glass filters from each company at a much higher cost.
The rest of the NiSi kit is made of aluminum. This is pretty good, but not perfect. First, NiSi’s aluminum is very thin, which makes it feel a bit cheap (Lee’s filter holder, however, is made of plastic — NiSi wins in this case either way). Also, although the aluminum has worked well so far, I would prefer brass filter threads instead. Aluminum threads don’t do as well in cold weather, and they are more prone to getting stuck on the lens. Plus, they have the tendency to wear out faster overtime (which we have not yet been able to test, but will definitely update the review in the future if it turns out to be true).
Finally, the leather carrying case for the filters is quite nice. It holds up to six rectangular filters (4×6 or 4×4), and it’s relatively small. If you use square filters, NiSi even provides plastic blank spacers for those, so that you do not have to turn the case over in order to get a hold of a shorter square filter, which is nice.
However, there is one potential problem with the filter case – while it is nice to be able to carry up to six filters, I would not recommend putting more than 4-5 in there. Partially because the case does not close as well anymore and partially because it has a tendency to bend and potentially scratch the first filter. Unfortunately, it seems like there is simply not enough reinforcement on the front of the case, which can result in its bending, as seen below:
The front of the case has a tendency to bend, which can potentially damage the first filter.
My case developed this behavior after several trips, although Spencer’s sample seems to be a bit better for now. If additional pressure is applied to the bent side, it can certainly break the first filter. And even if it does not, the magnetic button on the front has two mounting brackets on its back, which can certainly scratch even a glass filter. I wish NiSi reworked the case and found a way to provide additional protection and eliminate anything inside the case that might scratch filters overtime.
Overall, aside from the above-mentioned issue, the build quality of the NiSi equipment is quite good. As a whole, it is noticeably better than Lee’s, although not worth making the switch in and of itself.
3) Assembly
When you first try to set up your NiSi filter system, it can seem a bit counter-intuitive. That’s because there are a few important differences between NiSi and Lee filters. Assembling the filter system takes four steps:
3.1) Step-Up Ring
Unless you have a lens with an 82mm filter thread, you need a step-up ring to 82mm, as that’s the native size of the filter holder. The full NiSi system comes with three step-up rings: 67mm to 82mm, 72mm to 82mm and 77mm to 82mm. If any of your lenses has a different filter thread size, you’ll need to buy your own step-up ring to 82mm. The step up rings, along with the NiSi filter holder can be all stored in a larger leather case, as seen below:
3.2) Adapter Ring
Once you’ve attached the 82mm step-up ring, you can screw the “82mm adapter ring” onto your filter threads. The name “adapter ring” can be confusing, because there are a lot of rings involved in setting up a filter system. This adapter ring isn’t actually the piece that holds your square filters — this is what the square filter holder clamps onto.
There is one difference so far between NiSi filters and Lee filters. For Lee filters, the adapter ring (again, what the square filter holder clamps onto) doesn’t have a built-in 82mm filter thread – it comes in all sizes. You need to buy a separate adapter ring for each one of your lenses. My three main lenses, for example, each have their own filter thread sizes: 58mm, 67mm, and 77mm. So, I need three adapter rings as well — one for each size.
As explained above, NiSi is different. Instead of needing three adapter rings, I need three 82mm step-up filter threads, and only one adapter ring. I prefer the Lee system’s simplicity, but there is a good reason why NiSi does it this way: it allows for a built-in polarizing filter!
3.3) Polarizing Filter
This is the interesting part. Because of its design, NiSi’s adapter ring has a built-in way to attach a slim polarizing filter. This fixes one off the main problems with the Lee system — easy use of polarizers. With Lee, there are three ways to use a polarizer:
Attach a polarizing filter onto your lens, then attach the adapter ring directly onto the polarizing filter. This is a bad option, because it creates a lot of vignetting on wide-angle lenses. It also makes the polarizer almost impossible to remove from your lens — any time you try to spin it off, you end up just rotating the whole system instead. I tried this for a while, and it was a nightmare.
Instead, you can use Lee’s “105mm adapter” to attach a huge, round polarizing filter onto the very end of the filter system. In theory, this works well. However, it makes your filter system much larger, and it also can cause vignetting. Now that my widest lens is a 20mm rather than a 24mm, the vignetting is too strong, and this option no longer works (yes, I still use a polarizer on my 20mm lens – mostly for forests and waterfalls rather than blue skies, which turn uneven in brightness when you use a polarizer on a wide-angle lens).
Finally, you can use a square polarizing filter that slides into your Lee holder exactly like any other square or rectangular filter. There are two problems with this approach, although this is what I have been using with my own Lee system. First, it takes up one of the slots in your filter holder – not ideal when you need to stack several filters. Second, and more importantly, you no longer have the ability to turn the polarizer at any angle you want. Instead, you have to rotate the entire filter holder at once. This is a huge problem when you’re using a polarizer and an ND grad at the same time (you may want them rotated in different directions, which is impossible).
The NiSi system fixes these concerns, although it adds a small problem of its own.
So, how does the NiSi system work? Interestingly enough, there is a small wheel on top of Nisi’s “adapter ring” that actually lets you spin the polarizing filter! I am a big fan of this design. It lets you rotate the polarizer at any angle, and it takes up less space than any of the Lee options:
The one problem is that this polarizer adds another ring that you have to screw in. The polarizer saves space, but it makes things a bit more complicated. If you haven’t used the NiSi system for very long, it can be difficult to remember how to assemble and reassemble it. The Lee system might be simpler and more intuitive to assemble in comparison, especially for a first time user.
Still, on balance, this is an improvement. If you’re looking for a reason to switch from Lee to NiSi filters, this is it – the polarizer simply has a better design.
3.4) Filter Holder
Last is the filter holder itself. There isn’t much to explain here, as it is pretty much exactly like the Lee system. The filter holder has a small knob on the side, which you pull out as you’re placing the filter holder onto the adapter ring. Let go of the knob, and your filter holder stays in place.
4) Ease of Use
This is a double-edged sword. On one hand, as explained above, the polarizer is incredibly easy to use. The small wheel at the top of the adapter ring is a great design. I wish that all polarizers spun like this. However, the sheer number of rings in this system means that everything feels more convoluted than the Lee version. It isn’t any larger – in fact, it saves a bit of space and weight. It’s just more to keep track of in our opinion. Also, it takes a bit more time to swap your filter holder from lens to lens. With the Lee system, you just need to unclamp and clamp the filter holder; here, you need to unscrew and then screw in the adapter ring. Confusing? It’s a bit easier in practice, but still not as simple as the Lee system.
Lastly, NiSi’s filter holder itself doesn’t clamp as easily as the Lee system. What do I mean by that? If you’re trying to use any rectangular filters, it can take a moment before you get the square filter holder to attach properly to the adapter ring. I don’t know why this is the case — Lee’s is easier and quicker to use. However, this isn’t a major problem, just a minor annoyance.
In the end, Lee wins out in simplicity, but NiSi is still very usable. A few minor tweaks would even out the differences.
5) Optical Tests
As we have shown in our glass vs resin filters article, high-quality glass filters definitely outperform their resin counterparts. We have tested NiSi’s glass filters and they turned out to be superior to both Lee’s and HiTech’s resin filters. Let’s take a look at some of the comparisons between different filter types.
5.1) Two Stop (0.6) GND Filter Comparison
Here is a comparison of MTF results produced by Imatest, comparing the different types of 0.6 GND filters from NiSi, Lee and HiTech:
As you can see, NiSi filters practically do not cause losses in sharpness, whereas both Lee’s and HiTech’s resin filters showed up to 17.5% image degradation. Such optical performance might not be easy to spot on low resolution cameras, but once used on high-resolution cameras such as the Nikon D810 and Sony A7R II, the differences can become quite obvious.
At Photo Plus New York, NiSi showcased its glass filters and compared them to filters from Lee and Hitech. Their setup showed the performance of a NiSi glass filter using a special device, as seen in our interview below:
Obviously, the test was exaggerated quite a bit to make NiSi look good, but still, it made us want to check if their claims were actually true. After testing NiSi filters, we came to conclusion that their glass filters are indeed superior to most popular resin filters on the market. However, this also does not mean that NiSi has something to offer that Lee or HiTech do not – both companies actually offer their versions of glass filters. HiTech’s 0.6 GND Firecrest filters are made from 2mm thick Schott glass, and if you want to step up the game for professional video work, the company even offers 4mm thick Schott glass, which is basically as good as a filter can get. The 2mm Firecrest filters are sold at around $170, whereas their premium 4mm line starts at $350. HiTech’s 2mm filters are more expensive than the NiSi’s equivalent filters because HiTech bonds their filters, so the filter coating is sandwiched in between two pieces of glass. This greatly increases the durability of the filter as even anti-scratch coatings can be scratched. The HiTech 2mm filters are considerably harder to scratch and unlike many others, they would not be scratched by a fabric pouch. It is also important to understand differences between regular and Schott glass. Schott glass is made in Germany and it is the best glass in the world, so we encourage you to check out HiTech’s Firecrest line of products as well. Per requests from our readers, we will do our best to put HiTech’s Firecrest system to similar tests as well and report our findings in a separate review.
5.2) 10 Stop ND Filter Comparison
For our next test, we compared two 10 Stop ND filters from NiSi and HiTech. If you have experience shooting very long exposures, you probably know how images can get hurt with most resin filters, since they introduce quite a bit of color cast. Pretty much every resin filter that I have personally tested from Cokin, Lee and HiTech has always had color cast issues – some are on pinkish side, while others add a lot of green and blue color casts to images. How does the NiSi 10 stop ND filter compare in such cases? Let’s take a look at the following two images:
The image on the left is produced by NiSi’s 10 stop ND filter, while the image on the right is produced by HiTech’s 10 stop ND filter. See the difference in color? That’s not white balance – that color change is purely the result of the resin filter! When I first saw this in the field when testing out HiTech filters, I was really shocked to see such blue-rich colors. In all honesty, I don’t understand why companies like HiTech even sell such crappy filters, because it is impossible to take care of extreme color casts in post-processing. Even if you move your temperature slider towards oranges, it is not just the blues that are affected – this filter adds a bunch of green and red colors as well. You pretty much get the whole color spectrum added to your images and it is pretty bad! Glass filters and specifically the NiSi 10 stop ND filter here, do not have such problems. As you can see, the colors appear natural and there is not even a hint of color cast in the image.
What about sharpness differences? Well, that’s where it is a double loss for resin filters. Just take a look at the below MTF comparison:
Yikes! You might be wondering what happened here. Well, resin happened. As you can see, even with a 10 stop ND filter, NiSi performs really well. There is a slight loss of sharpness in the center, but it is not something you would be able to see in images. Mid-frame and the corners are definitely impacted and that’s expected when a filter is cutting down so much light from entering into the lens. However, that’s nothing compared to what happens with a 10 stop ND resin filter – look how bad that HiTech filter does in comparison. That’s practically a 30% drop in sharpness. Not only does the HiTech filter add nasty color casts, it also does massive damage to image sharpness!
5.3) Polarizing Filter Comparison
Lastly, we wanted to see how good the provided glass polarizing filter is when compared to a high-end polarizing filter from B+W, specifically the B+W Kaesemann 82mm MRC Nano, which by itself costs around $135. After going back and forth to measure sharpness between these filters, we could not spot any noticeable differences in performance – the difference was less than 1-2%, which falls into margin of error. So the NiSi filter seems to be as good as the B+W filter in terms of not impacting image sharpness.
However, there are a few important points to add here. First of all, the B+W filter can be mounted independently on any lens with a 82mm filter thread, whereas the thin 82mm NiSi filter can only be used on the NiSi filter holder. Second, the B+W Kaesemann polarizer does not reduce as much light going into the lens – in our tests, we saw approximately 1 full stop of light loss. The NiSi polarizer, on the other hand, had much more light loss – approximately 1.3 to 1.5 stops of light loss in comparison. Third, the B+W filter has noticeably better coating, which does not add as much ghosting and flare to images as the NiSi filter. And lastly, the B+W filter is made from high quality metal and brass filter ring, whereas the NiSi polarizer feels quite cheap in comparison with its lightweight aluminum construction. In short, you definitely get what you pay for with B+W polarizers. But how useful are all these features if you cannot use them with filter holders? That’s where the NiSi polarizer comes in and for that, it does a pretty decent job!
NiSi’s large carrying case for the filter holder and adapters
6) Filter Gradation
Our friend Simone Conti pointed out an interesting observation about NiSi filters that was worth looking into – he said that the gradation of the GND filters was a bit too long when compared to Lee filters. I decided to investigate this issue further and see what he meant, so after I got back from Photo Plus, I put both Lee’s and NiSi’s 0.6 GND filters side-by-side to see what he meant. Indeed, the gradation on the Lee filter appears to be much more sudden. Basically, the filter starts out transparent on the bottom, then the middle of the filter is where the filter softly switches from transparent to 2 stops darker. From just a little higher all the way to to the top, the filter stops about the same amount of light.
In comparison, NiSi’s gradation appears to be much more spread out – the filter starts transitioning in the center and gets progressively darker towards the top edge. There does not seem to be a set “boundary” or a threshold to this gradation in the middle of the filter like on the Lee filter, so it just gets its 2 stop darkness only towards the very top of the filter. This might not be a big deal for most photographers out there, but I would certainly prefer to see NiSi modify the filters, so that the transition happens in the middle of the filter, rather than gradually spread across half of the filter height. Why would this be a potential issue? Well, the NiSi filter simply makes it harder to see exactly where to stop the filter when looking through the viewfinder or composing via live view. The smoother / more spread out gradation can work out great for some environments where one perhaps desires to slowly transition from one area of the frame to another (which can be especially useful when photographing cityscapes with tall buildings and mountainscapes with high peaks), but considering that it is only a two stop filter, I do not think it would be that much of a concern in most situations. Personally, I prefer the gradation to occur in a smaller area in the center of the filter.
7) Other Concerns
A few other reviews online have mentioned that NiSi filter holder slides directly onto the lens (with foam to keep it in place) rather than screwing onto the filter threads. This is no longer the case. For all the versions currently sold, NiSi filters are like the Lee system – they attach via your filter threads. This seems like a much better option, and the old version was resulting in a lot of negative reviews. It seems that NiSi listened to their feedback and redesigned the system.
Also, a lot of people may be wondering if the NiSi system works for ultra-wide lenses without filter threads, like the Nikon 14-24mm f/2.8G. The short answer is yes, but anyone who uses these lenses knows how difficult it is to find a good filter set. Here, you need much larger filters (150mm rather than 100mm) and an entirely different filter holder system if you want it to work. We didn’t test that particular system, so we can’t provide our perspective at this time.
8) Verdict Against the Lee System
For some people, the NiSi system has some noticeable improvements over the Lee filter system. First, the build quality is better, which is certainly nice. Especially with the carrying case, the NiSi system feels a bit more complete. But, more importantly, the polarizing filter situation strongly favors NiSi. This is why both Spencer and I are sticking with the NiSi system from now on. There aren’t huge differences between the two, but NiSi just makes our lives a lot easier when we need to use a polarizer and a grad filter at the same time (which happens relatively often for our landscape work).
Here’s what we would say — if your polarizing situation with Lee is bothering you, it may be worth the switch. Otherwise, there is no reason to switch from Lee, because there really aren’t that many differences between the two holders. If you are just starting out, either is a good choice. We cannot conclusively recommend one over the other. The Lee system is simpler and quicker to use, but the NiSi system is better-made and handles a polarizing filter more elegantly.
Remember, too, that you can swap out the rectangular filters between these two systems without a problem. So, if you prefer, you can use a filter holder from one system and actual filters from another, which is great! Actually, given how well glass filters from NiSi perform compared to Lee, that might be an excellent choice for those who want to keep their Lee filter holders, but want to stay away from resin.
Ultimately, not taking price into account, both systems are very similar. If you need a square filter system, you can’t go wrong either way.
9) Price Comparison and Conclusion
Filter systems like this are sold as components, not as a whole set. Here are the links to each of the NiSi items mentioned in this review. NiSi is primarily sold through Amazon, although you can now find it at B&H Photo Video as well:
NiSi filter system, $158 (Includes 67mm to 82mm, 72mm to 82mm, and 77mm to 82mm step-up filter threads. Also includes NiSi’s adapter ring, polarizing filter, and square filter holder).
Is this cheaper or more expensive than Lee’s system? Ignoring the leather case, which I recommend regardless of the filter system you use, NiSi is noticeably less expensive than Lee. Here, are the total costs:
Clearly, Lee is more expensive for a comparable filter lineup. Without the cost of the leather case, the NiSi system is $441. A comparable Lee system is $605 (or $635 if you have the wide-angle adapter ring) and it does not come with all the adapters that are included with NiSi. That’s a large difference for such similar products. Because of this, I am inclined to recommend that a beginner goes with the NiSi system instead of the Lee system. But, if you already have the Lee system and don’t have a problem with your polarizers, there’s no need to jump ship.
Hopefully, this helped you decide if the NiSi filter system is right for you. It isn’t perfect, but a lot of people will see benefits here that Lee doesn’t provide – and vice versa. It’s all up to your specific needs.
This is a quick review of the FotodioX Nikon F to Fujifilm G-mount adapter, which allows mounting Nikon G-type lenses on the new Fuji GFX 50S camera. While it is always ideal to use native lenses on any camera system, the idea of using a lens from a different camera system on a mirrorless camera can be appealing for a number of reasons. Aside from potential savings, one can take advantage of the mirrorless technology (see mirrorless vs DSLR for details) and use the ability to zoom in on a subject while framing to potentially yield a higher number of in-focus shots compared to a DSLR. In addition, lens adapters also open up opportunities to use specialty lenses that are not yet available for the system, which in the case of the new Fuji GFX 50S, is certainly worth looking into, since the system is very new and only three native mount lenses are available at the moment. While shooting with the Fuji GFX 50S, I wondered how well my Nikon lenses would do on the medium format camera, so I decided to give the FotodioX Nikon F to Fuji G-mount adapter a try.
Normally, one would only consider lenses designed for a larger recording medium to be used on a smaller system. A lens designed for a larger film or sensor would have a big enough image circle to cover the whole area of the sensor, without introducing vignetting or other optical issues. In this particular case, I went the other way around by using full-frame lenses on a medium format camera. One might be wondering why anyone would even consider doing this, since images might need to be heavily cropped. However, considering that the medium format sensor on the Fuji GFX 50S is not significantly larger in comparison (43.8×32.9mm vs 35.9x24mm – see Fuji GFX 50S Considerations), some full-frame lenses might have a large enough image circle to cover the whole sensor, eliminating the need to crop images. In addition, it is unlikely that Fuji will release very fast native prime lenses for the GFX 50S (such lenses would be very costly, large and heavy), so the idea of being able to mount something like the Nikon 85mm f/1.4G is very appealing for a medium format shooter – especially if they are after beautiful bokeh and even shallower depth of field.
Lens Adapter Issues
Unfortunately, all lens adapters have one big issue – they add another mount point. If manufacturing tolerances are less than ideal (which they often are), adapters end up hurting image sharpness, particularly at the edges of the frame. In addition, low-pass filter stacks can vary a great deal between different camera systems, which can negatively impact edge sharpness even more. For these reasons, I do not recommend using lenses for landscape or architecture photography (where edge sharpness is important) via adapters – it is always better to use native mount lenses that are designed to yield maximum sharpness across the frame.
However, adapters can be quite useful for shooting portraiture, where edge sharpness is not important. In such situations, using a telephoto lens with a lens adapter can result in very appealing images.
Keep in mind that the FotodioX Nikon F to Fuji G mount adapter is a “dumb” adapter, which means that you will need to manually focus with every Nikon lens – there are no AF communication capabilities.
Build Quality and Construction
While one might think that all lens adapters are the same in terms of build quality, my experience has proven otherwise. I have tested a number of adapters for the Sony A7R II in the past and I have found many of them to be average to poor in quality. Keep in mind that even a quarter of a millimeter can have an impact on image sharpness with adapters, so if you want to have the best edge to edge sharpness, you might need to go through a few of them. Interestingly, although some brands were better than others overall, tolerances were not necessarily better – sometimes using two of the same exact adapter would yield completely different results. Knowing this, in the case of the FotodioX Nikon F to Fuji G mount adapter, I did not care to test several samples for tolerances, since my goal was not to use the adapter for the best edge-to-edge sharpness. I knew that most of my landscape lenses would not do well on medium format due to smaller image circle and resulting vignetting problems, so my goal was only to see how usable my Nikon telephoto lenses would be on the Fuji GFX 50S.
The FotodioX Nikon F to Fuji G mount adapter is fully made from metal. Both the G-mount and the F-mount sides have a metallic finish as shown in the picture above, whereas the middle section of the adapter is painted black. The middle section has a smooth finish and the rotating aperture ring has two textured areas for better grip. The non-moving part of the adapter has “Fotodiox Pro Nik(G) – GFX engraving on it, whereas the moving part has aperture engravings showing large to small aperture:
There is no corresponding F-number next to aperture size, because maximum and minimum aperture vary greatly by lens. When changing aperture, the aperture ring can be either rotated by the little metallic lever on the side, or by holding the two textured areas of the ring. The ring rotates pretty smoothly, although resistance on my copy definitely decreases towards the last three dots when stopping down. When looking at the adapter from the top, one can observe the aperture lever move inside – as expected, this is a mechanical adapter, which means that it only works with Nikon’s “G” type lenses that have an aperture lever on the mount. Unfortunately, you will not be able to stop down any of the newer “E” type lenses with this adapter – those will require an electronic adapter.
Using the Adapter
There are two red marks on each side of the mount to help align the dots with the camera mount or the lens and I found them to be pretty accurate. Mounting the adapter on the camera is relatively easy and once it is in place, it clicks and stays secure. My sample was a bit tough to securely mount on the GFX 50S and required quite a bit of force to put in the clicking position. After mounting and dismounting it a few times, it got a little better.
Once the adapter is mounted on the camera, mounting a Nikon lens is no different than mounting it on a camera body – align the red dot on the mount with the white dot on the lens and rotate the lens counter-clockwise until it clicks into place. To release / dismount the lens, you will need to push in the little spring-based ear located close to the red mark first. Keep in mind that if you are planning to use an older Nikon lens with an aperture ring, you will need to stop the lens down to the smallest aperture before being able to use the aperture ring on the FotodioX adapter.
Here is the Noct-NIKKOR 58mm f/1.2 mounted on the Fuji GFX 50S with the FotodioX adapter:
Noct-NIKKOR 58mm f/1.2 Mounted on the Fuji GFX 50S
As you can see from the image, the lens is set to the maximum aperture – the little pointer is pointing at the first diaphragm.
Use with Noct-NIKKOR 58mm f/1.2
Personally, one of the very first lenses I wanted to try out on the GFX was the Noct-NIKKOR 58mm f/1.2, a legendary classic, one of the greatest and fastest lenses Nikon has ever made. I am a proud owner of the Noct and it is the lens I cherish more than any of the newer lenses Nikon has recently made, although they might be sharper in comparison. Check out my Noct-NIKKOR 58mm f/1.2 review for more information about this little gem.
GFX 50S + 58mm @ 58mm, ISO 100, 1/60, f/1.0
The way the Noct-NIKKOR 58mm f/1.2 renders bokeh is just out of this world! To my surprise, the lens did not show any serious signs of vignetting in images. There is definitely vignetting present at the edges of the frame, but it is mostly from the beautiful natural vignetting the lens produces at large apertures.
Focusing at large apertures is tough for sure though, especially when it is a little windy outside and everything is moving. Here, I set the lens focus to minimum focus distance, then moved my body towards the flower until the area I was interested in was in focus.
Being able to shoot at f/1.2 with the GFX 50S is pretty amazing, so as soon as the sun set, I positioned my little girl Jasmine right next to a window and shot the below portrait:
As you can see, her front face and her right shoulder were lit by the weak blue light outside, while the yellow indoor bulbs illuminated her other side and the background. Focusing on her left eye was easy with the GFX 50S – the press of the rear dial zooms in to the focus point instantly, just like on the Fuji X-T2, so all I had to do on my end was move the focus ring on the Noct until a part of her eye was in focus. At such a close distance and large aperture, I had to make sure that I don’t rock back and forth while doing it, since depth of field was almost paper thin!
Use with Nikon 85mm f/1.8G
Earlier in the day, I also had a chance to test the Nikon 85mm f/1.8G with the GFX 50S. Here is a portrait of Jasmine at f/1.8:
It is no Noct, but for its price, the Nikon 85mm f/1.8G is an amazing portrait lens. Very sharp and renders background very smoothly. There is no vignetting to worry about and the lens covers the whole image sensor. If you own the Nikon 85mm f/1.4G, it also covers the whole sensor and beautifully renders images – at f/1.4, you can get even shallower depth of field for those stunning portraits.
Tested Lenses and Notes
So far, I have tested the FotodioX adapter with a number of Nikon lenses. While many lenses are good enough to cover the whole image circle, some lenses are going to be poor choices to use with this adapter. For example, the Nikon 24-120mm f/4G is a very bad choice, because the lens shows heavy vignetting at every focal length. Its image circle is barely large enough to cover a full-frame sensor, so it does not do well at all on the GFX 50S. The same is true with a few other modern Nikon lenses. However, some of the older classics work surprisingly well with the adapter and are capable of fully covering the GFX 50S sensor:
Unfortunately, it is impossible to tell which lenses do better than others, since it all depends on how big of an image circle each lens produces. Since tilt-shift lenses typically have large image circles, those should do quite well on the GFX 50S, as long as the lenses are not shifted too much. Generally, longer lenses should be less problematic, but it depends on their design. As you can see, the 105mm f/2.8G VR Macro showed visible vignetting at infinity focus, whereas much shorter focal length lenses such as the 35mm f/2.8 AiS showed no signs of vignetting.
Conclusion
If you have already purchased, or planning to purchase the Fuji GFX 50S medium format camera and you already own Nikon lenses, you might want to take a serious look at the FotodioX Nikon F to Fuji G mount adapter. As you can see from this review, while Fuji is busy working on producing native lenses for the GFX 50S, you can already take advantage of some of the existing Nikon glass to produce beautiful portraits. As long as the lens you are planning to use covers the whole image sensor and does not vignette heavily, you will be able to step down in lens size without major issues. Overall, I can certainly recommend this adapter to be used with Nikon lenses on the GFX 50S. It seems like a solid, quality product worth considering for those who want to mount Nikon lenses on the Fujifilm G mount.
In this article, I’m going to review the Palette Gear Expert Kit. This is a control surface that consists of buttons, dials and sliders, all of which are meant to be used with a variety of photo and video editing programs. They can also be used with everyday computer operation such as web browsers and operating systems. Personally, I use it with Lightroom for working with photos, Premiere Pro for working with videos, and Chrome for web browsing.
I first saw Palette’s product on the show floor of PhotoPlus in New York City. It immediately caught my attention, as I’d always wanted to add something to my workflow that would potentially help increase my productivity and streamline my workflow. Between the high amount of customizability and the apparent build quality of the product, I knew this product had potential. Did it live up to my hopes? Read on to find out.
1) First Impressions
My first impressions when I got my hands on a Palette setup were very good. It has very nice packaging, with bold colors and graphics. The box feels like it contains a high quality product. Upon opening the box, I was greeted with very neat and organized pieces. The included quick start guide is simple and to the point. The actual product (the buttons, dials and sliders) have a great look, feel and finish. Overall, it seems like a quality product.
Palette Gear Expert Kit Packaging – Interior
I went to their website to view some of the tutorials that are available, just so I’d have an idea of how Palette works. The tutorials are short and informative, just what I needed to get up and running quickly.
2) Software
The first step in using Palette is installing the software, which I needed to download from their website. Once installation was complete, I was ready to start setting it up.
Palette Gear Software View
Setup is very easy. The first step was to plug the hardware into my computer. Once I opened the software, I was presented with a virtual view of the physical product that was sitting in front of me. If I decided I didn’t like the layout, I could physically change it and the software would recognize the changes I made. (if you notice the left/right buttons are mixed up in the screenshots, I accidentally did that when I reorganized the modules, so don’t fault the software for that)
Palette Gear Software View – Rearranged Modules
Changing the function of each module is very easy. In the software, simply click on the module you wish to change, choose the new action and you’re done! As you can see from this screenshot, I changed the far-right slider from “Crop Angle” to “Vertical Transform” (which would be very useful if you do a lot of perspective correction). I also changed the color of the slider itself, from red to green.
The software also includes the option to have multiple profiles set up. They can be for the same software (for example, a photo culling profile and a photo editing profile). They can also be for different pieces of software. As I mentioned, I have profiles set up for Lightroom, Premiere Pro and web browsing.
Palette Gear Software View – Multiple Profiles
This is pretty much it for the initial setup! The hardest part is deciding what function each module should perform. Fortunately, the software comes with pre-populated quick start profiles for many different types of software. You also have the ability to load profiles that you’ve downloaded, of which there are a huge variety of user-created profiles on Palette’s profile page.
Palette Gear Software – Quick Start Profiles
2.1) Software Settings
The software is also somewhat customizable. The most notable of these customizations is automatic profile switching. For example, if you find yourself toggling back and forth between editing photos in Lightroom and Photoshop, the software will automatically switch profiles to match the current application. The software must be open for the hardware to work. Fortunately, it can be set to automatically launch at startup. It can also be set to close to the menu bar, which keeps it from sitting on your desktop the entire time it’s open.
Automatic profile switching is great when you’re switching between different programs, but what happens when you want to change profiles in the same program (say from image culling to image editing)? You can program one of the Palette modules to switch to the next profile, allowing you to quickly jump to the next profile without ever leaving your current program.
One other important thing to mention about Palette’s software is that it uses the Adobe Software Developer’s Kit (SDK). This allows it to hook directly into most of the software that Adobe makes, giving the hardware control over software options that may not even be accessible via keyboard shortcuts. Keep this in mind while setting up your controls, as you might be surprised by how many options are available.
3) Hardware
The physical Palette product is very nice. It has many different features that stand out, of which I’m going to cover a few here:
USB Powered – The entire unit is USB powered, so no external power supply is needed. The supplied USB cable plugs into the core module, which then powers all additional modules that are attached. Magnetic Connections – Each module has recessed magnets on each side. This allows for solid connections between modules and quick, easy repositioning. One thing to note is that while the magnets are strong, they won’t hold all of the modules together if you try to carry them around unsupported while they’re still connected. I picked up the entire assembly by one corner, took a few steps and they fell apart. Fortunately, they had a soft landing and nothing was damaged, but I quickly learned my lesson about how strong the magnets actually are. Now when I pick up my Palette setup, I support it with my hand underneath and have not had any incidents.
Palette Gear Modules – Side view with connectors and magnets
Color Mapping – Through the software, it’s possible to change the color of the LED lights on each module. This isn’t a feature that’s just for show. Many people make strong associations between color and function, so this can help with remembering what each module does in a variety of profiles.
Palette Gear Modules – Lighting
Rubberized Bottoms – Each module has rubberized grips on the bottom. This means that the entire Palette assembly won’t move around during use.
The individual modules are very well designed. They’re lightweight, but feel substantial. The buttons are large, arcade-style buttons that are sturdy and responsive. The sliders have enough resistance to make fine adjustments, but not so much that they’re hard to use with slight finger movements. The dials don’t have set start/stop points, so they spin infinitely. Their action is smooth and easy to adjust, while their surface has just enough texture to respond to a light touch. Not only do the dials respond to being turned, but they also have a push response (like a button) which allows a third variable to be programmed.
Palette Gear Hardware – Different Module SetupsPalette Gear Hardware – Different Module Setups
While the different kits come with a variety of modules, not all of the modules have to be used. For example, you might want to do some work on the road but don’t want to bring the entire Palette kit. No problem. You can just grab a few modules and the core and you’re ready to hit the road. You can even create a new profile for your travel setup!
Palette Gear Hardware – Minimal Travel Setup
4) Cost
For a peripheral, Palette is not cheap. Compared to a mouse or a keyboard, the entry-level price tag of $199 for the Starter Kit can be a little daunting. Of course, Palette plays a much different role than a mouse or keyboard. While many people who use it will find it just as essential to their computing experience, many other users will only use it occasionally for one or two specific things.
That’s not to say it’s unreasonable or not worth it. The prices for a Palette setup run from $199-$499. That closely resembles what you might expect to pay for a Wacom tablet, which has a much more specific function and is much more limited in which programs it can be used with. Palette is also a very well-made, highly-configurable product with terrific software.
Cost is always relative, so while some people might see an expensive product that doesn’t really do anything they can’t already do, other people might see something that will improve their workflow and make their time spent sitting in front of a computer easier. For those people, the value of Palette easily outweighs the cost.
5) Actual Use
Once all of the different profiles are set up and the modules are arranged, Palette is ready to use. The suggested placement for the modules is a location where they can be used with your non-mouse hand. This allows you to use both hands simultaneously while you’re working. It does take a while to get used to, especially if you have an established work style. If you’ve ever switched from a mouse to a Wacom tablet for photo editing, you’ll know exactly what I’m talking about. Initially, it’s frustrating and slows down your work, but eventually you get used to it and it starts to feel natural.
The automatic profile switching is one of the features that really makes incorporating Palette seamless. If I had to manually switch between profiles every time I changed applications, it would either drive me crazy or I’d only end up using it for one thing and not use it for anything else. Fortunately, I can switch back and forth between editing photos and working online and Palette keeps up with me. There is a small notification that pops up every time the profile switches, which can be a little distracting, but it’s a small price to pay for the convenience it adds.
The actual hardware is intuitive to use. All of the different modules are distinct enough that they can be used by touch alone. The dials are very easy to turn, but you can adjust their sensitivity in the software if you find the amount of adjustment needs to be changed (the same can be done for the sliders). I did find that pressing the dials was a little harder than I thought it would be, so I didn’t use that function as much as I thought I would.
The sliders are interesting to use. Since they have a hard start/stop point, the software knows the slider position at all times. This can cause some unique interactions while using them. For example, if I use the slider to increase exposure by +1.0 stops while editing a photo, the slider will be moved off of center (due to increasing exposure). Once I move to the next unedited image, the initial exposure is set to “0” in Lightroom, but the slider is still set to a position of “+1.0” stops. Lightroom ignores the slider location if I don’t use the slider. If I do use the slider, the exposure automatically jumps to the slider position, meaning it’s new starting point is “+1.0” stops. This can make adjusting exposure complicated if you’re used to adjusting from a starting exposure of “0” (like most of us probably are).
6) My Personal Experience
I was having a hard time figuring out how exactly to incorporate Palette into my workflow. I had lots of ideas for how I wanted to use it, but all of the obvious uses seemed to be more trouble than they were worth. Initially I chalked this up to not choosing the correct options for each module, so I tried some of the quick start profiles. It still didn’t feel intuitive to me, so I talked with Andy from Palette and he gave me some good tips. The tip that I found to be the most helpful was to make a profile for each step of my workflow. It turns out I was trying to do too many different things with the same profile.
Once I simplified my profiles, things became much easier. Using Palette seemed much more intuitive and it fit into my workflow better. Another thing that Andy mentioned helped even more. He had mentioned how helpful it is to program complex key combinations to be performed with the buttons. For example, to copy develop settings in Lightroom on a Mac, you have to press “Command+Shift+C”. By assigning that combination to a button (and assigning paste to another button), I can quickly and repeatedly perform those actions with one hand, allowing me to speed up my entire editing process. My first instinct was to make each module perform a simple function that I frequently use, most of which have single-key keyboard shortcuts, but it turns out that isn’t the ideal setup for me.
After a bit more use, I made an important realization… I don’t need all of the modules that come with the Expert Kit. I’m sure some people can find a use for them, but I just don’t use them all. Once I realized that I didn’t have to rack my brain to figure out how to use every dial and slider, things got a lot easier. In Lightroom I mainly just use two buttons. I also use a slider, but instead of using it to edit photos I use it to control the volume of my music and media! In Premiere Pro, I’ve found uses for the buttons, knobs and sliders, but still have yet to use everything included in the Expert Kit.
Another thing that I realized is that established habits are hard to break. I’ve been editing photos the same way for years. I have certain patterns that I follow and a muscle memory for pretty much everything I do. Using keyboard shortcuts is deeply ingrained in my workflow, so in my case Palette is essentially trying to replace keyboard shortcuts. Adding Palette into my workflow felt very disruptive, but not really in a bad way. I would catch myself doing things my usual way, completely forgetting that I had another option. I was forced to slow down and think about what I was doing and consciously force myself to do things differently.
I think this is a big part of why it took me so long to get comfortable using Palette. Disrupting an established workflow is hard. I was expecting Palette to streamline my editing process and instead it slowed it down. I wanted it to do everything and instead couldn’t figure out how to do anything with it. It wasn’t until I realized that it shouldn’t replace my existing workflow and instead should supplement it that I really got a feel for how useful it could be.
7) Conclusion
Palette is a very well made product that has the potential to increase your productivity and simplify your workflow. It consists of a variety of programmable knobs, buttons and sliders, all of which can be customized in a variety of profiles that work with most types of programs. The software is easy to use and full of options that will help you maximize Palette’s usefulness.
If you’re wondering if Palette would fit into your workflow, think about how you’d use it. If you don’t heavily rely on keyboard shortcuts and find yourself constantly using your mouse to open menus and adjust settings in various programs that you use, Palette would probably be a great tool to add to your workflow. If you constantly use keyboard shortcuts that are complex and involve a lot of keys, or maybe you want to have quick access to certain tools and commands in a variety of programs, changes are you’ll find Palette to be useful. On the other hand, if you have a very established workflow and rely heavily on keyboard shortcuts, you might find Palette very hard to get used to. That’s not to say you won’t find it helpful, but your experience might closely resemble mine and your journey might start out a little more frustrating than you had planned on.
Overall, I have to say that Palette is an amazing product. It does exactly what it’s supposed to, and it does it well. It might not be a perfect fit for everyone, but even if you have very established habits and your workflow is dialed in, you might be surprised by how useful it can be.
I tested the Palette Gear Expert Kit, which retails for $299.99 USD. It includes:
While some people might consider cell phone photography inferior to using a “real” camera, there are many who strongly believe that, as Chase Jarvis says, the best camera is the one that you have with you. These days, that camera is typically going to be a phone. With that in mind, what if you could add the flexibility of interchangeable lenses to your phone’s camera? That’s exactly what Aukey’s cell phone lenses do. In this post I’ll be reviewing a Wide angle and a 2x Telephoto lens. Also, since it seemed appropriate for a phone accessory review, all photos are taken with a cell phone.
Every once in a while, I come across gadgets that sound promising, because they serve a specific purpose that I have needs for. When browsing the web last July, I came across a post on a popular site that praised a smart tracker called ANKR. The post started out by talking about stolen gear and how unfortunate the incidents were. Then it went on to introduce ANKR and how amazing of a find it was to be able to “geolocate” (those were the words used) items such as the camera bag in case it got stolen. It all sounded really good, because it seemed to address my particular fear of getting my gear stolen, especially when traveling overseas.
Many photographers who want to upgrade their tripod are stuck choosing between high-end aluminum tripods and low-end carbon fiber models. These two types of tripod tend to be similar in price, which makes the decision even more difficult. I have been trying out the carbon fiber Oben CC-2461 tripod over the past few months, along with the accompanying BE-126T ballhead. This review covers my experiences and recommendations for photographers trying to decide on a tripod at this price point.
During our trip to Turkey, Lola and I had a chance to briefly meet with my Turkish friends from MIOPS.com, the talent behind MIOPS Smart Trigger and Nero Trigger (see our detailed review of Nero Trigger). MIOPS is a small business that operates out of Turkey, with an exceptionally knowledgeable team of software and hardware engineers. I first met the MIOPS team at the Photo Plus Expo in New York back in 2013 and since then we have become good friends. So when they found out that Lola and I were flying out to Istanbul, they invited both of us to their corporate office for a tour of their production facilities. Since I had a couple of cameras with me during the trip, I requested to record an interview with the team in order to introduce both the product and the talented team behind the product to our readers. In this article, I would like to share the recorded interview with our readers and provide some information on the MIOPS Smart Trigger. If you have never heard of this little device, I would definitely encourage you to read on, since this little gadget might get your creative juices flowing with all kinds of new photography ideas.
MIOPS Smart Camera Trigger is a camera and flash trigger in a single unit. It provides seven different triggering modes, including lightning, sound, and laser. It also functions as an intervalometer for timelapse photography. It has an HDR mode, a scenario mode, and a DIY mode. With the smartphone app, you can also use the trigger in four shutter release modes: cable release, press and hold, press and lock, and timed release. The past few days I have had a lot of fun playing with my MIOPS Trigger, and I would like to share my experiences with you.